 English
 Dansk
 Deutsch
 English
 Español
 Français
 Hrvatski
 Italiano
 Magyar
 Nederlands
 Norsk
 Polski
 Română
 Slovenský
 Slovenščina
 Suomi
 Svenska
 Čeština
 Ελληνική
 Български


You don’t need a large Christmas tree or elaborately decorated spaces to achieve a festive atmosphere. In small flats in particular, it’s worth incorporating walls, doors, and the space above tables and sideboards into your decorations. Anything that’s hung or makes use of narrow spaces is especially effective.
Creating a few larger focal points on walls, doors or windows often has a greater impact than displaying lots of smaller items. You can even replace a traditional Christmas tree with a compact or flat alternative. Using just twigs, wire, wooden beads and poinsettias, you can make DIY decorations that take up little floor space and are easy to put together.
We showcase a range of solutions, from seasonal diorama decorations in cardboard boxes and Christmas tree-shaped wall decorations, to festively decorated, free-hanging wire spirals.
Note
Did you know that the colourful ‘flowers’ of the poinsettia are actually bracts? This plant, also known as the Christmas or Advent star, can be grown in pots or used as cut flowers. For simplicity, we sometimes refer to cut poinsettias as ‘cut flowers’ or simply ‘flowers’, even though the correct botanical term would be ‘cut stems’.
➡️ Poinsettias as cut flowers: decoration ideas and cutting techniques
Table of Contents
- Christmas decorations for small spaces: a wire coat hanger Christmas tree
- Upcycling idea: Cardboard Christmas decorations
- Natural and space-saving: DIY twig star
- Poinsettia and branch Christmas tree wall decoration
- Mini branch Christmas tree for small rooms
- Golden bauble and wooden bead Christmas wreath
- Wired juniper hanging decoration
- From mini to large: poinsettias to suit any space
Christmas decorations for small spaces: a wire coat hanger Christmas tree
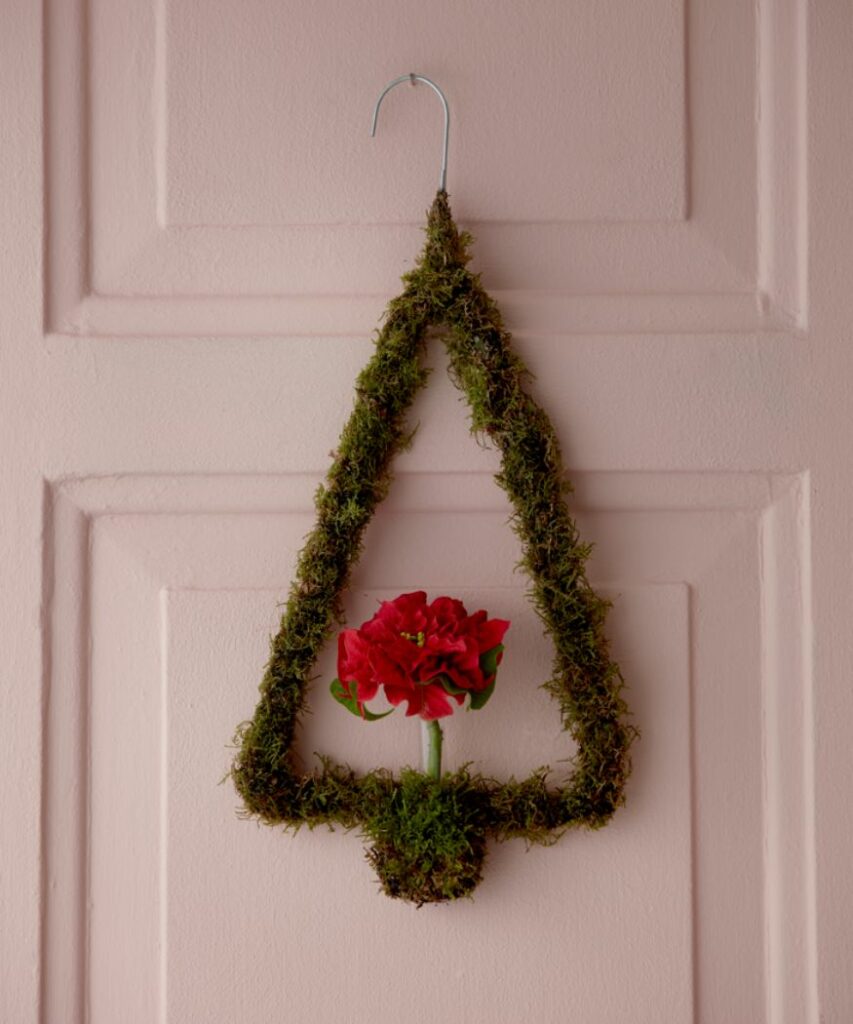
This little Christmas tree doesn’t take up any floor space: it hangs from a door, wall or window, making it perfect for small rooms. Its base is simply a wire coat hanger decorated with moss and a cut poinsettia.
What you’ll need
• Wire coat hanger
• Moss
• Cut poinsettia stem
• Test tube
• Craft wire
• Pliers
• Wirecutters
• A glass of hot water (about 60°C)
• A glass of cold water
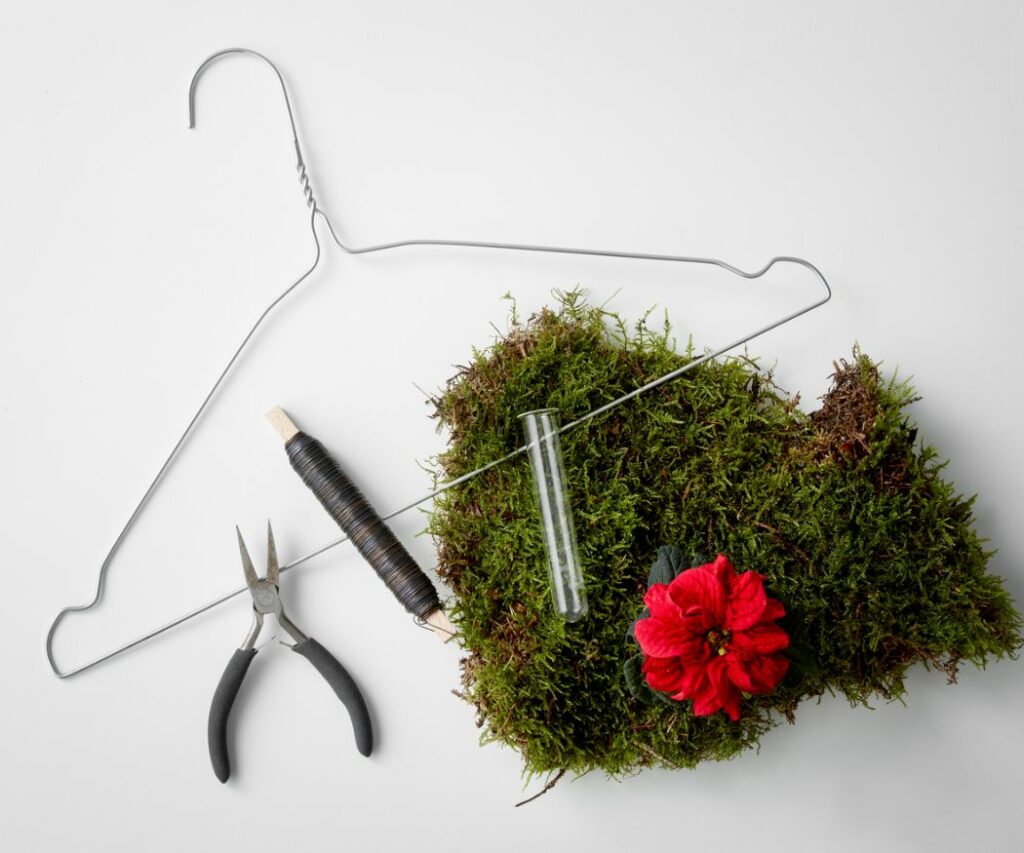
How to do it
- Shape the hanger
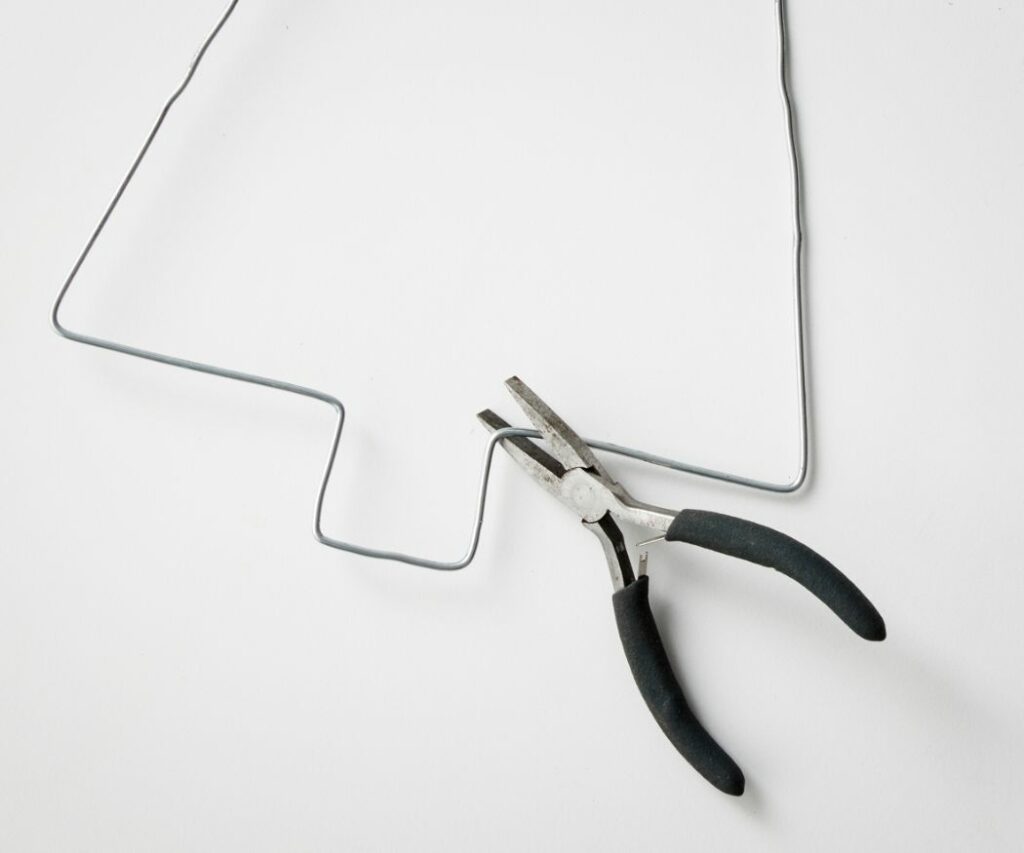
Use the pliers to bend the wire coat hanger into a stylised Christmas tree shape. Leave the hook in place to hang the finished decoration from. - Attach the moss
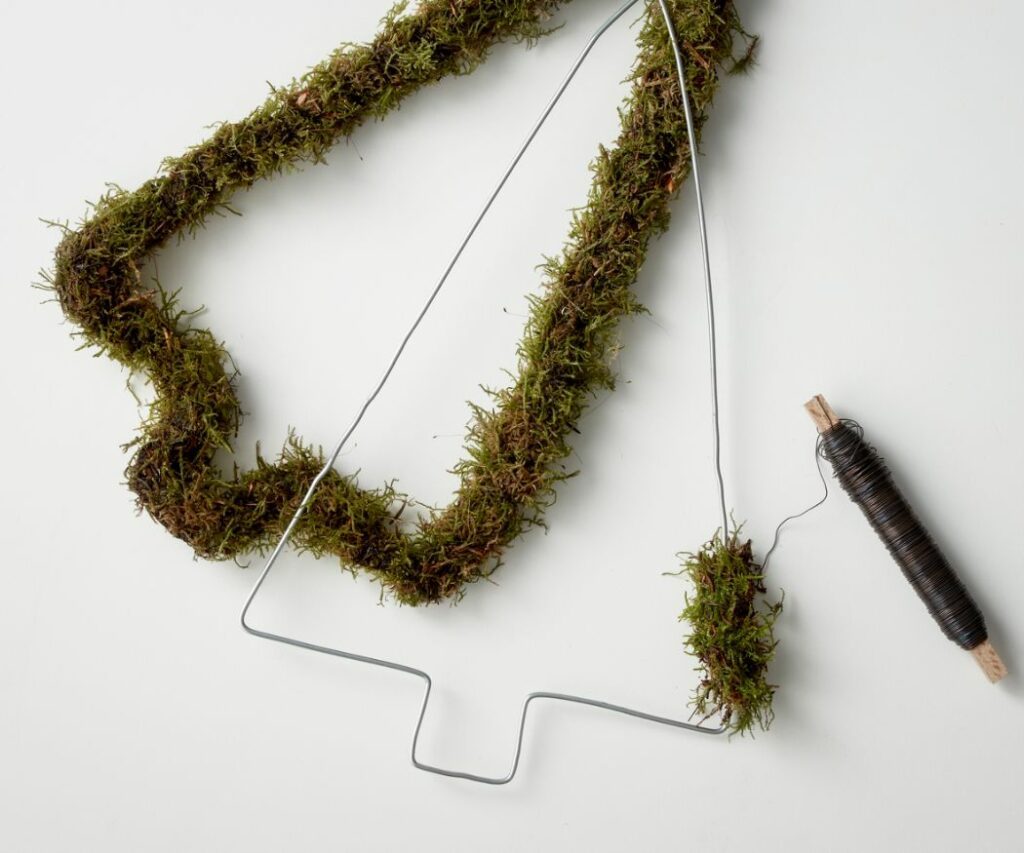
Wrap the moss around the wire frame and secure it bit by bit with the craft wire. Distribute it as evenly as possible until the wire is completely covered. - Attach the test tube
Tie the test tube to the base of the tree using craft wire. Alternatively, attach it higher up and let it hang in the centre of the tree. - Add the poinsettia
Cut off a poinsettia stem and remove the lower leaves if necessary. Dip the cut end into the glass of hot water for a few seconds, then into the cold water. This stops the milky sap escaping. Fill the test tube with clean water and place the stem inside.

Tip: Collecting moss
You can either collect moss from your own property or purchase it from a garden centre. Collecting moss may be restricted or prohibited in forests, depending on the type and quantity. Check your local regulations beforehand.
Upcycling idea: Christmas decorations using cardboard
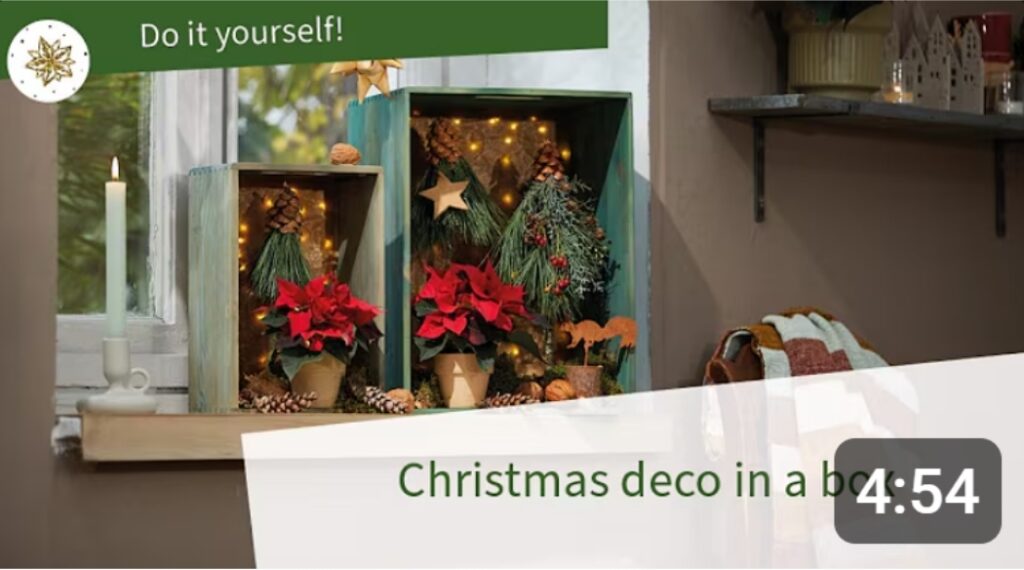
An old cardboard delivery box can be transformed into a little stage for poinsettias. Line it with paper and decorate it with fairy lights, natural materials and festive baubles to create a compact Christmas display that can be placed on a shelf, chest of drawers, windowsill or small table. Pure festive cheer on a budget!
This video shows, step by step, how simple cardboard boxes can be transformed into a variety of displays featuring a range of upcycling ideas.
Natural and space-saving: DIY twig star
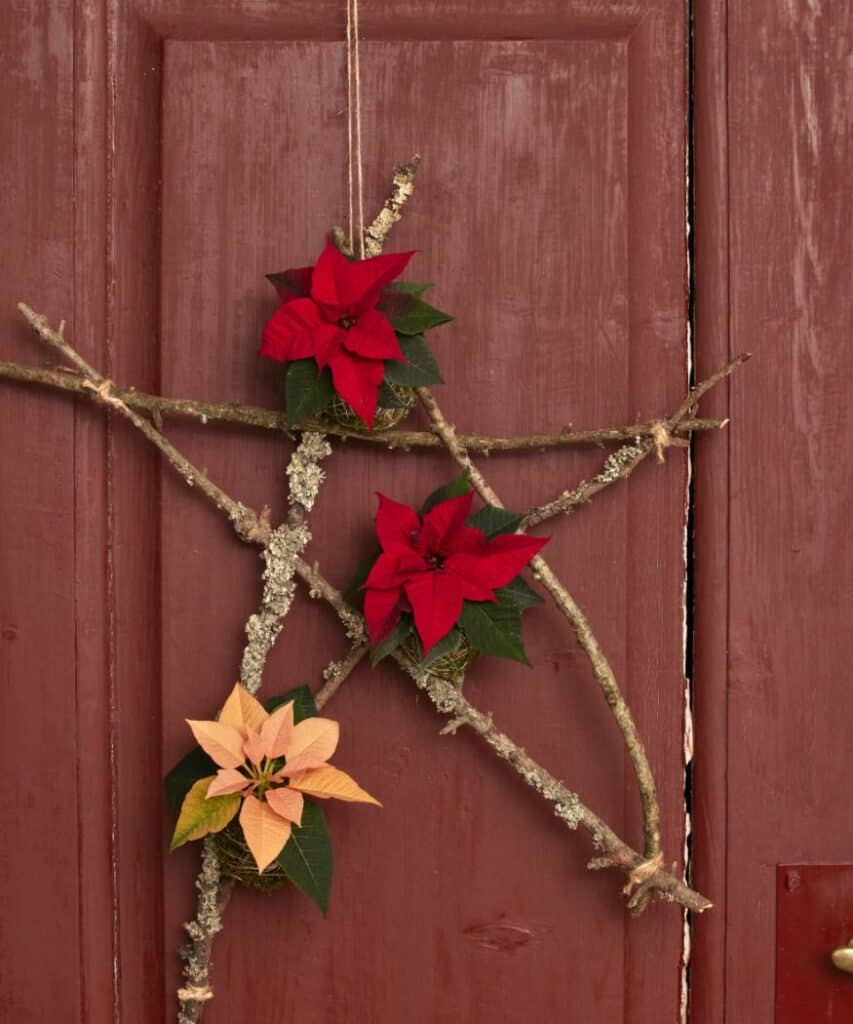
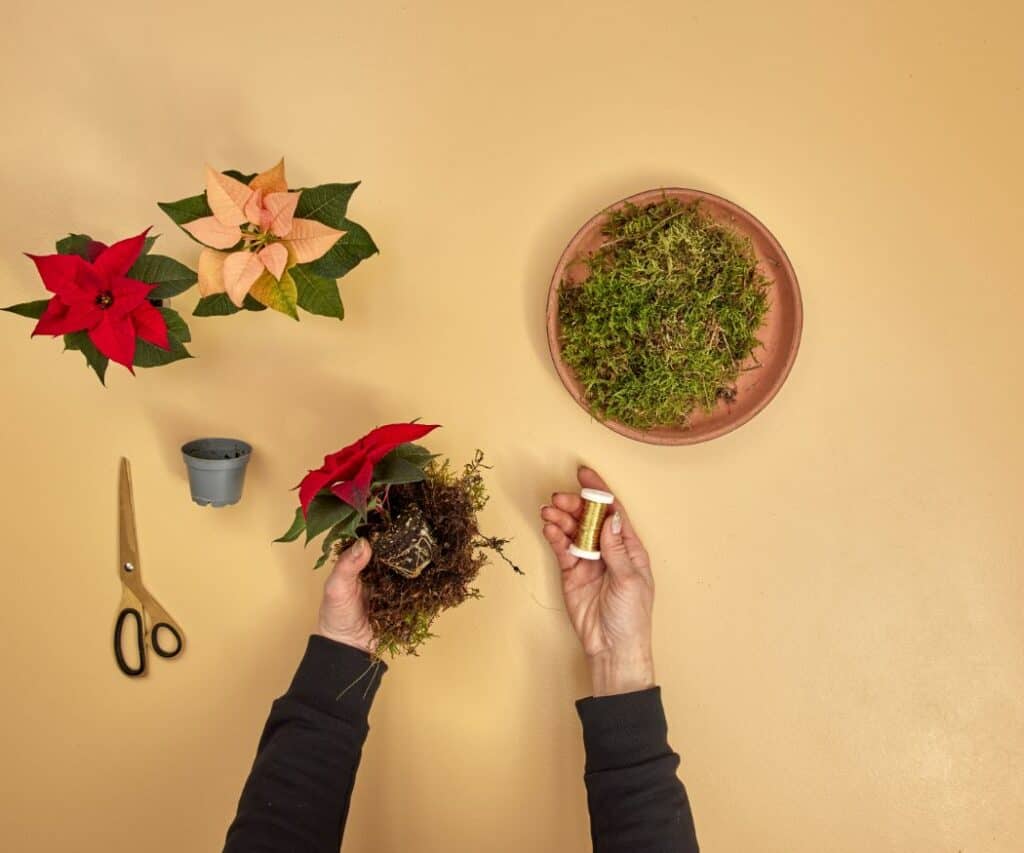
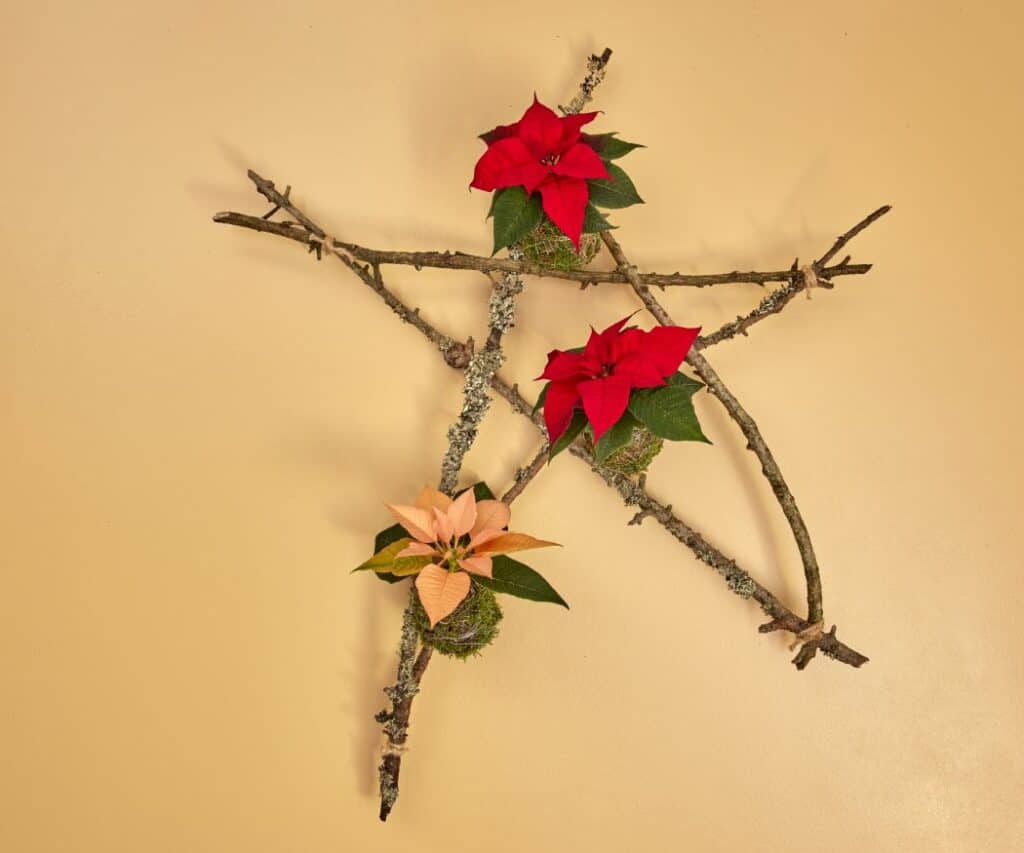
Twigs, moss and mini poinsettias are the main elements of this simple festive wall decoration. The little plants are attached directly to the star, without pots, as kokedamas with their root balls wrapped in moss.
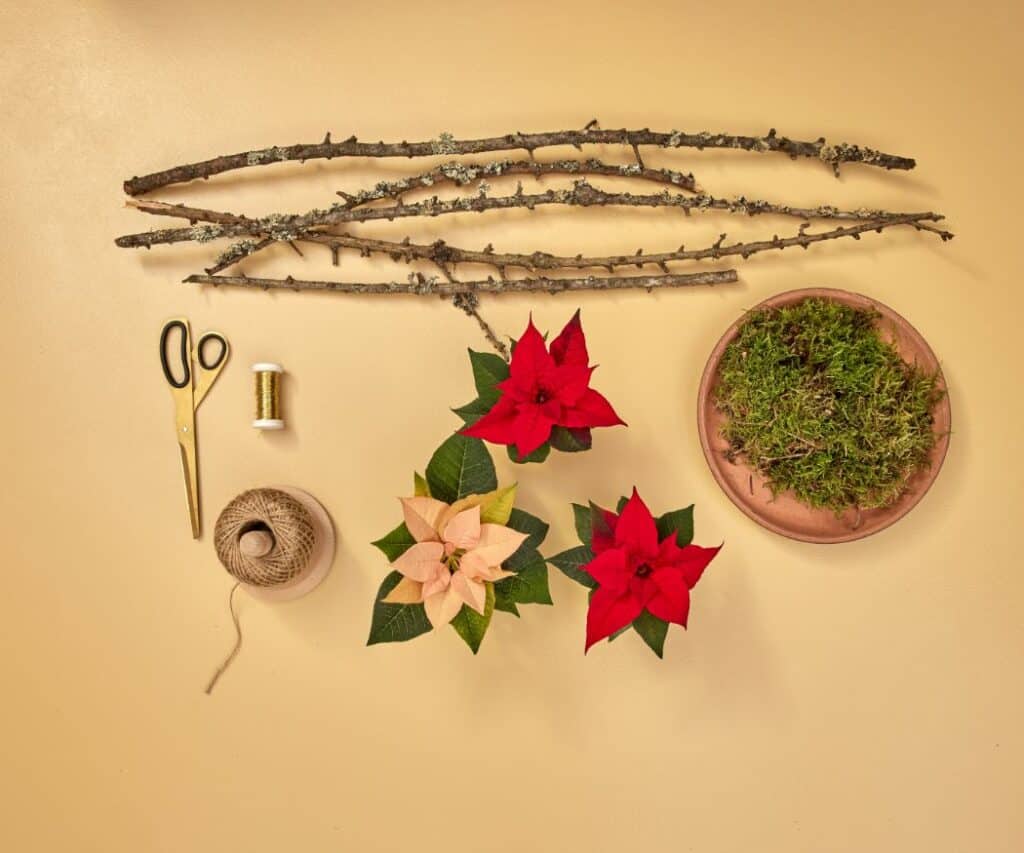
What you’ll need
• five straight twigs covered in lichen
• three mini poinsettias
• moss
• twine
• gold wire
• scissors
How to make it
- Make the star
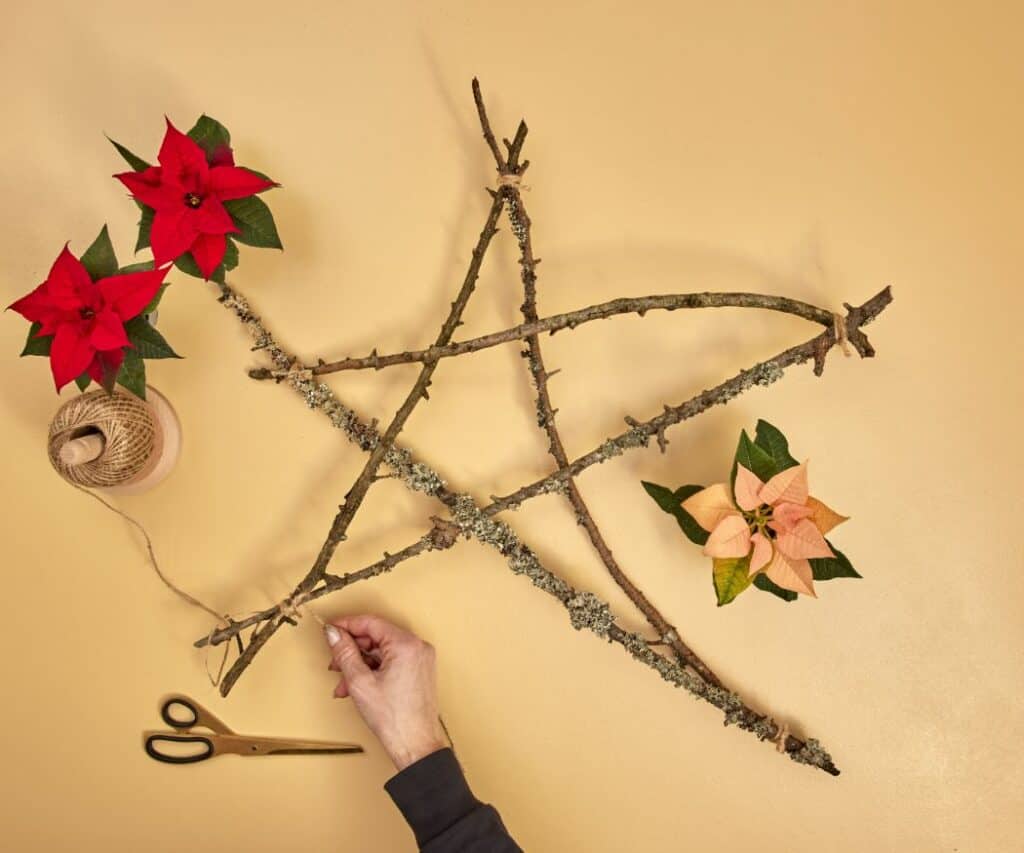
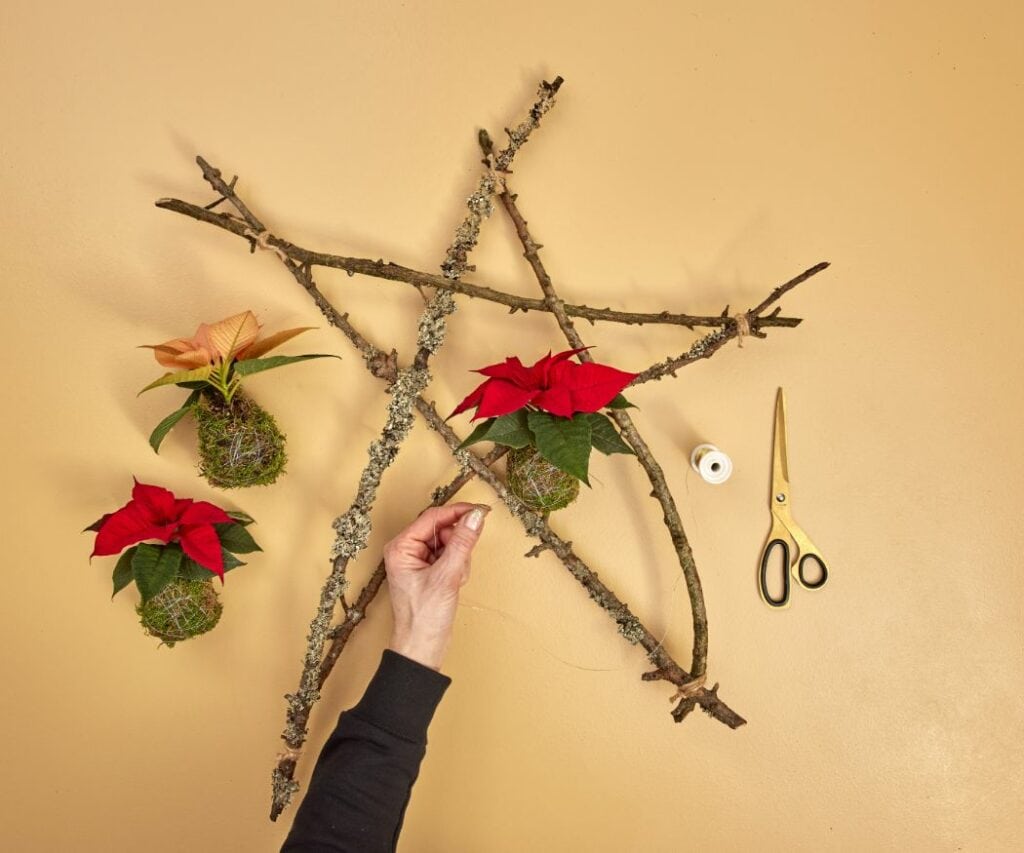
Arrange the five twigs into a star shape and bind them together with twine at the tips and where they cross. Pull the twine tight so the star can support the weight of the plants. - Prepare the kokedamas
First, soak the mini poinsettias in water and let them drain thoroughly. Carefully remove them from their pots and completely wrap the root balls in moss. - Secure the moss
Wrap the moss balls in a criss-cross pattern with the gold wire until the moss is firmly secured to the root ball. Twist the ends of the wire together firmly. - Attach the poinsettias
Arrange the three kokedamas on the twig star and secure them in place with more gold wire. Hang the star on a wall, door, or any other suitable place.
Tip: How to water the kokedamas
Remove the moss balls from the star and submerge the them in room-temperature water. As soon as no more air bubbles rise to the surface, remove them, let them drain thoroughly, then reattach them to the star.
➡️ Poinsettia care: How to get it right every time
Poinsettia and branch Christmas tree wall decoration
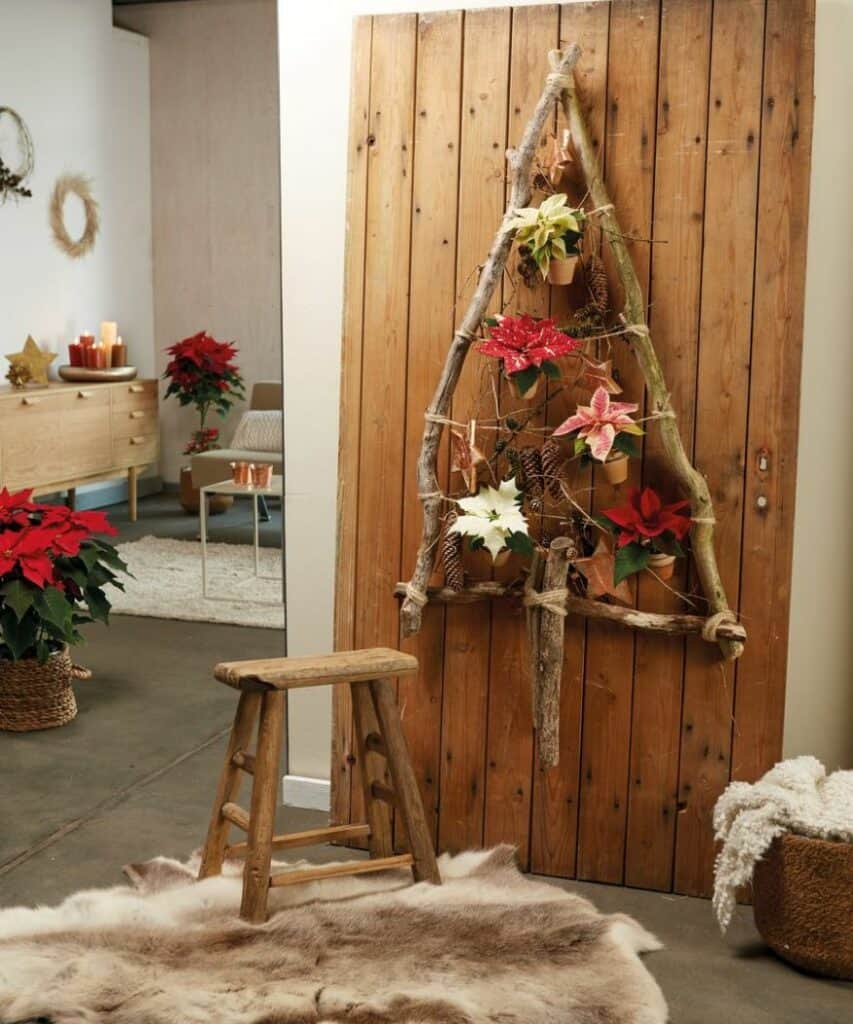
No room for a traditional Christmas tree? This wall decoration, made from branches, won’t take up any floor space. Mini poinsettias, pine cones and wooden stars adorn the simple structure.
What you’ll need
• A cordless screwdriver and screws, including one long screw
• A large wooden panel, such as an old door
• Two longer and two shorter branches
• Twine
• Small terracotta pots
• Paper-covered wire
• Mini poinsettias
• For decoration: pine cones, wooden stars, clematis tendrils
How to do it
- Build the tree
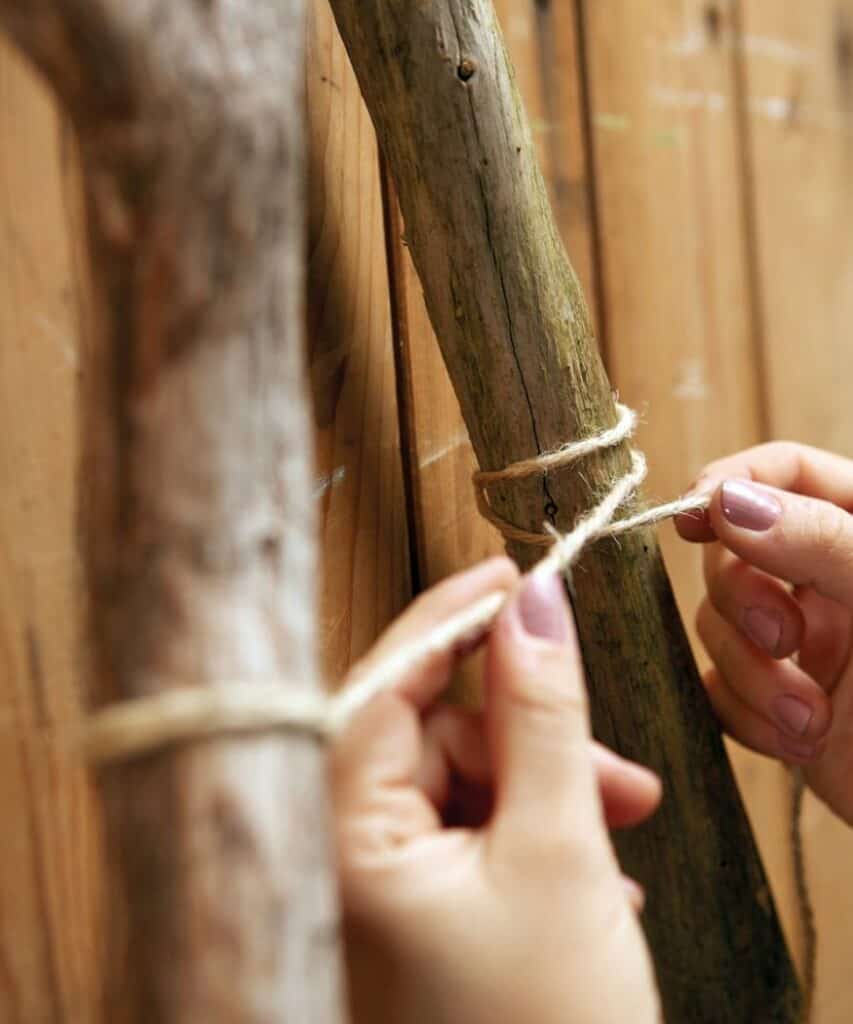
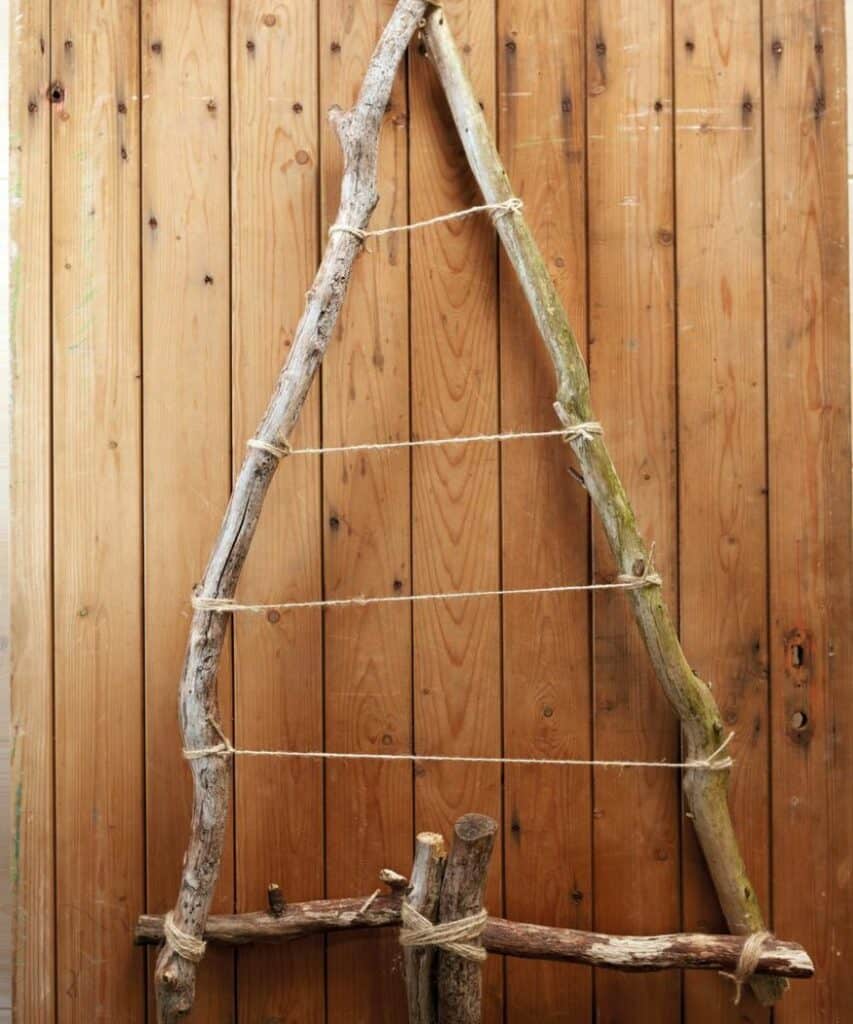
Cut the branches to your chosen length and arrange them to form a stylised Christmas tree. Screw the branches together, then wrap twine around the joints to hide the screws. - Prepare the hanging mechanism
Screw the long screw into the wooden board and hang the branch structure from it. Next, tie twine horizontally between the side branches at various heights. Plants and decorations will be attached to these later. - Decide on a location
Place the wooden board in its final position before you start decorating. This mean you won’t have to move the fully decorated structure later on. - Attach poinsettias and decorations
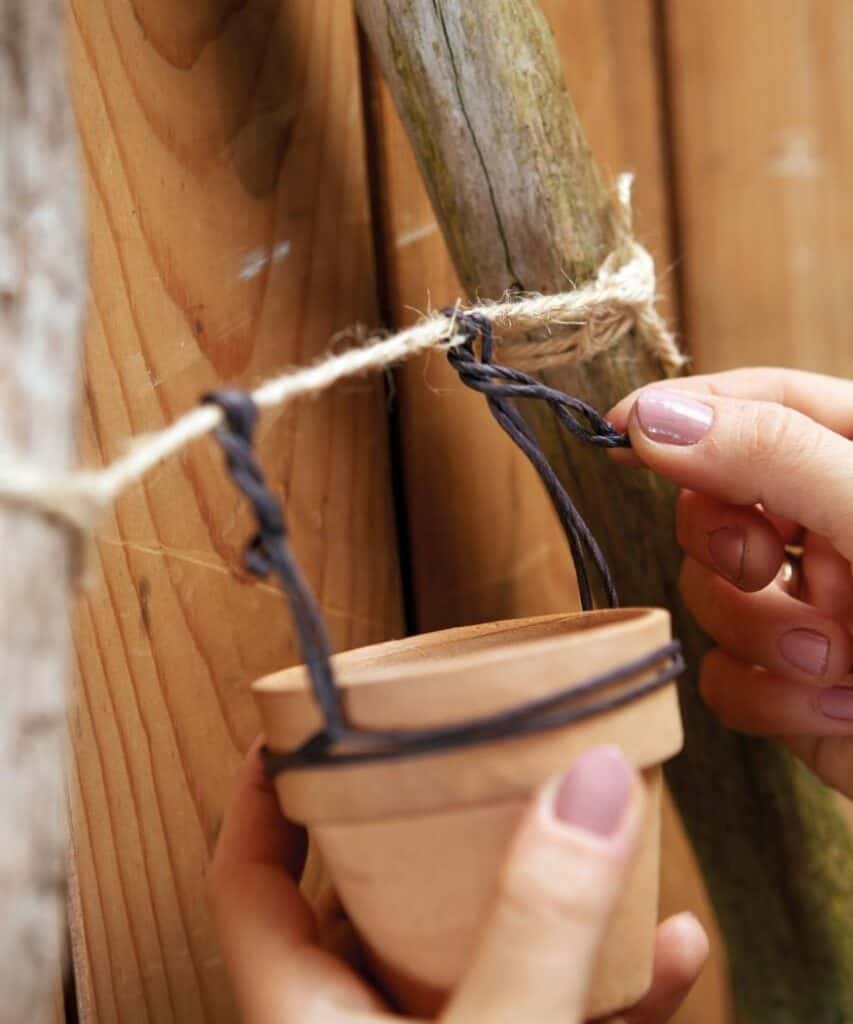
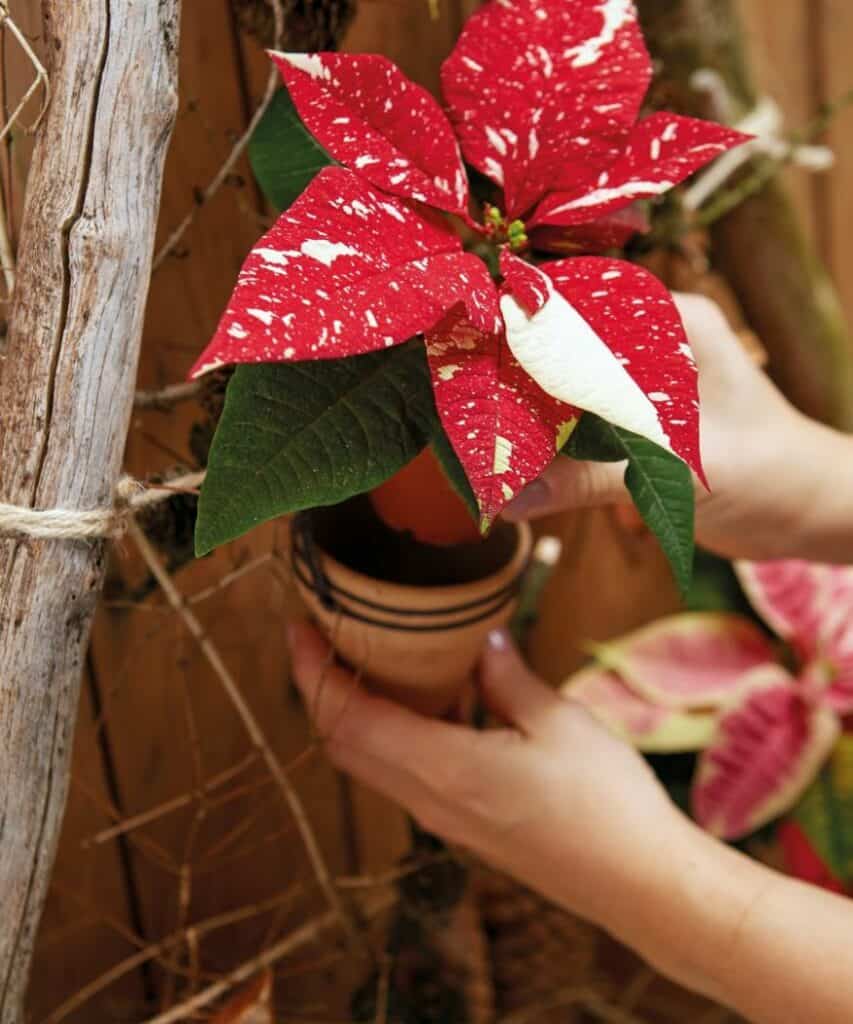
Place the mini poinsettias in the small terracotta pots. Secure the pots to the taut twine using paper-covered wire. Decorate with pine cones, wooden stars and clematis tendrils, as desired.
Tip: Preparing natural materials
Carefully brush off any dirt from branches, vines, and pine cones before you start crafting. Leave them to dry completely. If you want to keep the materials for longer, you can also seal them with an appropriate clear varnish.
Mini branch Christmas tree for small rooms
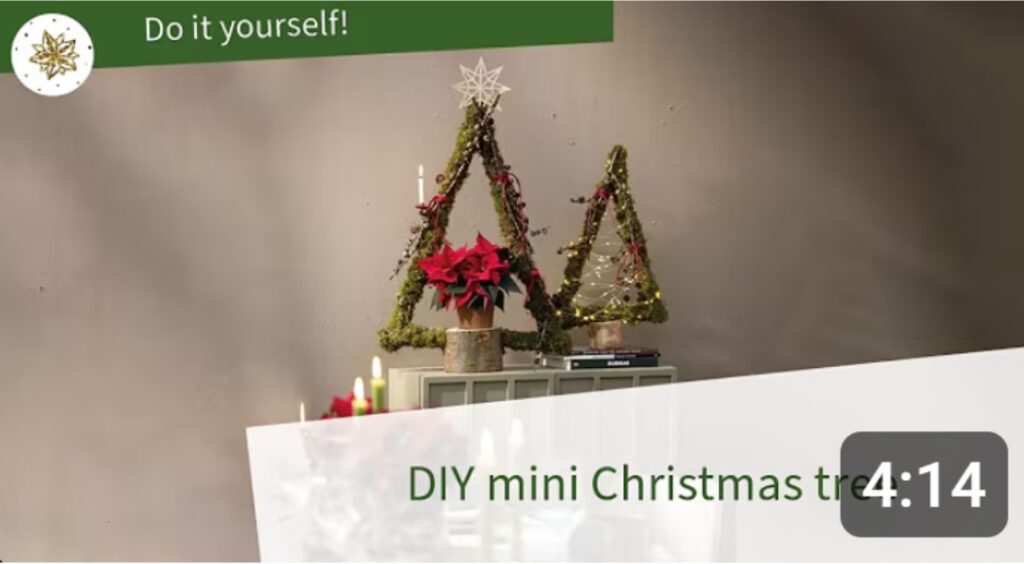
If you don’t want to go without a Christmas tree altogether, why not make a smaller version? In this design, branches are arranged on a log to form the shape of a tree. Add a touch of green with moss and larch twigs and place a potted poinsettia in the centre. This tree is also ideal for a windowsill. Watch the video to see how to put together and decorate this mini Christmas tree.
Golden bauble and wooden bead Christmas wreath
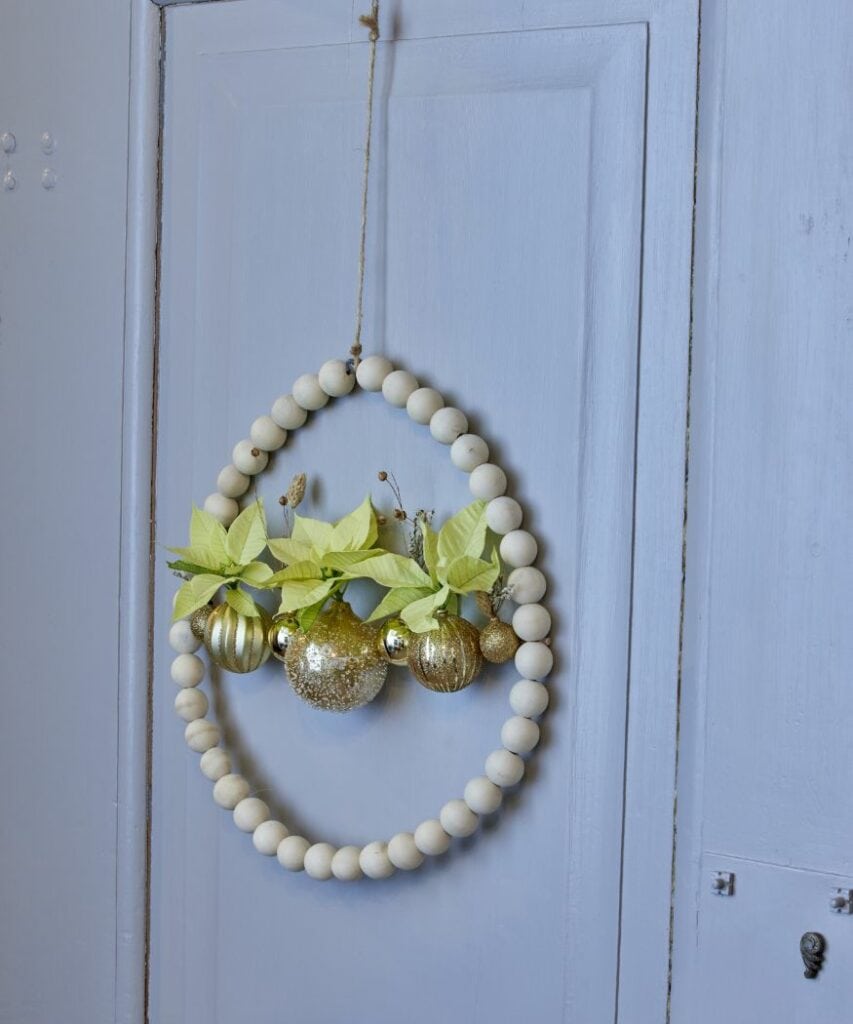
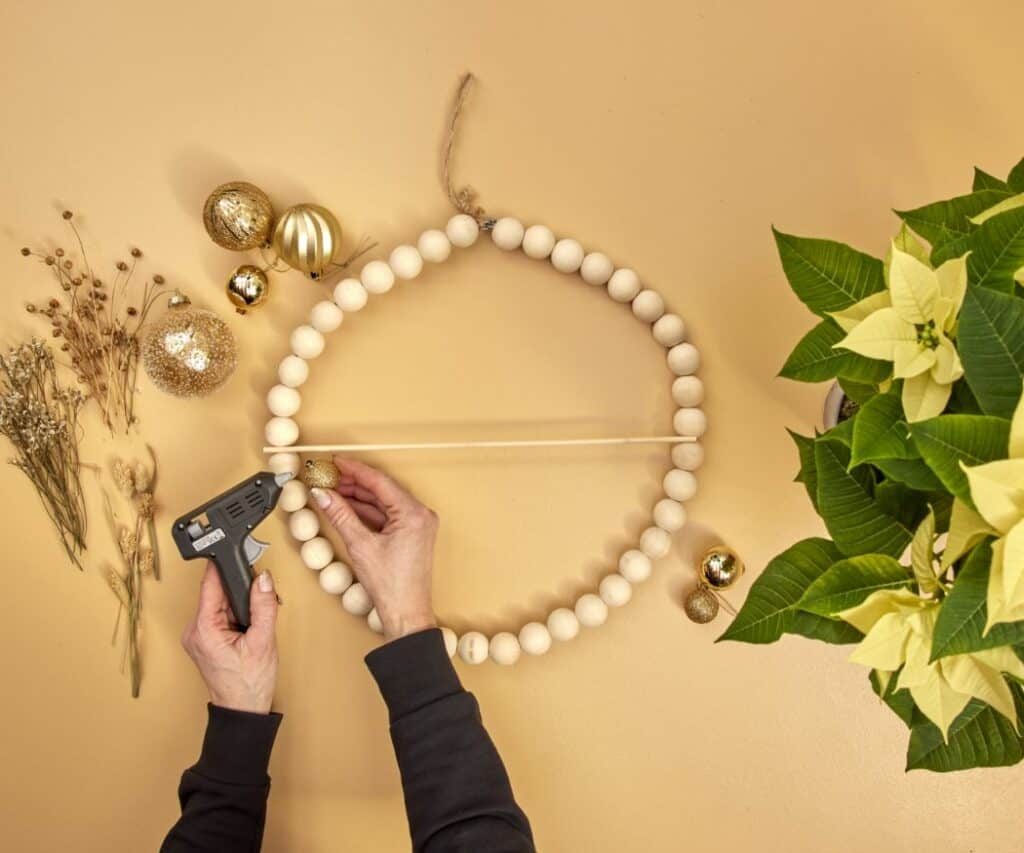
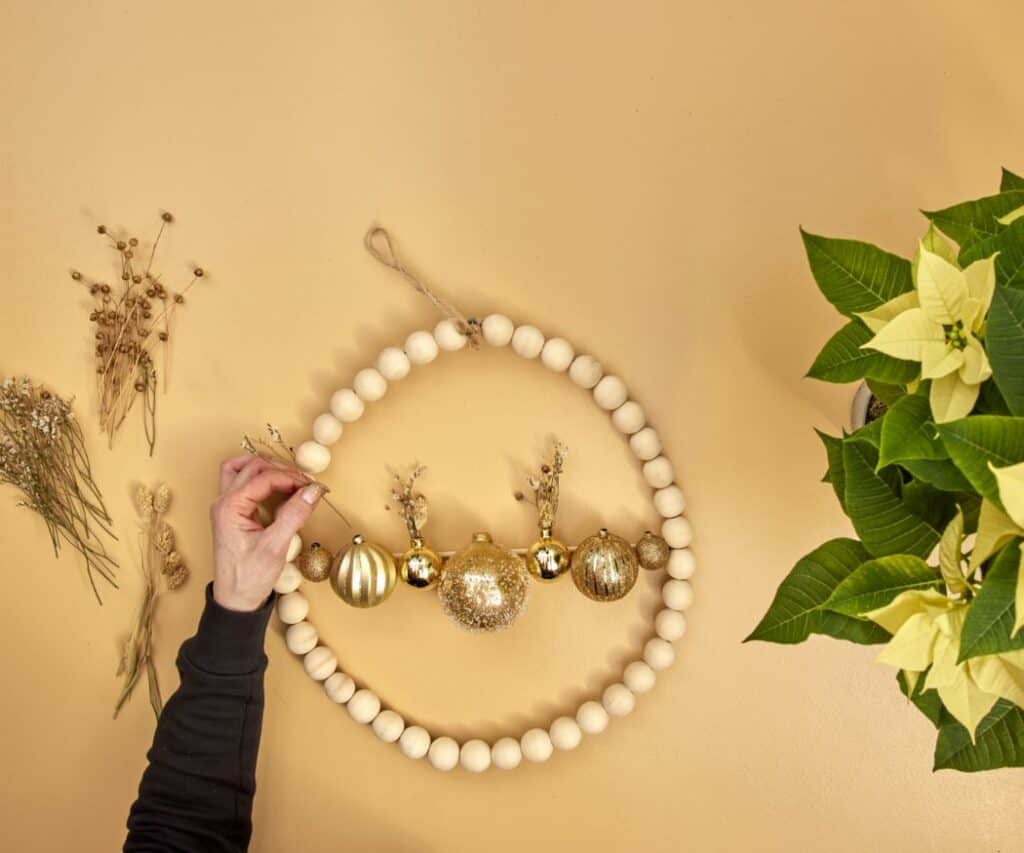
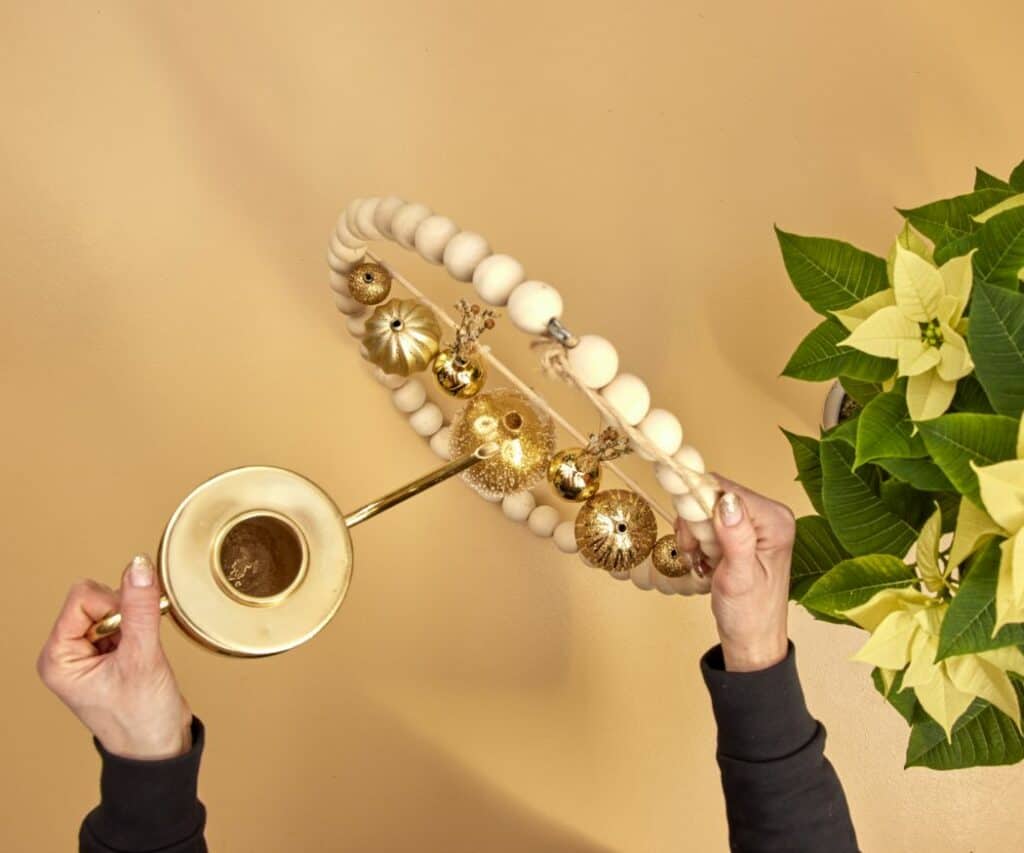
This wreath features a combination of simple wooden beads, shiny Christmas baubles, and cream poinsettias. The highlight: some of the baubles serve as miniature vases for cut poinsettia stems. Whether hung on a door or window, it takes up no floor space.
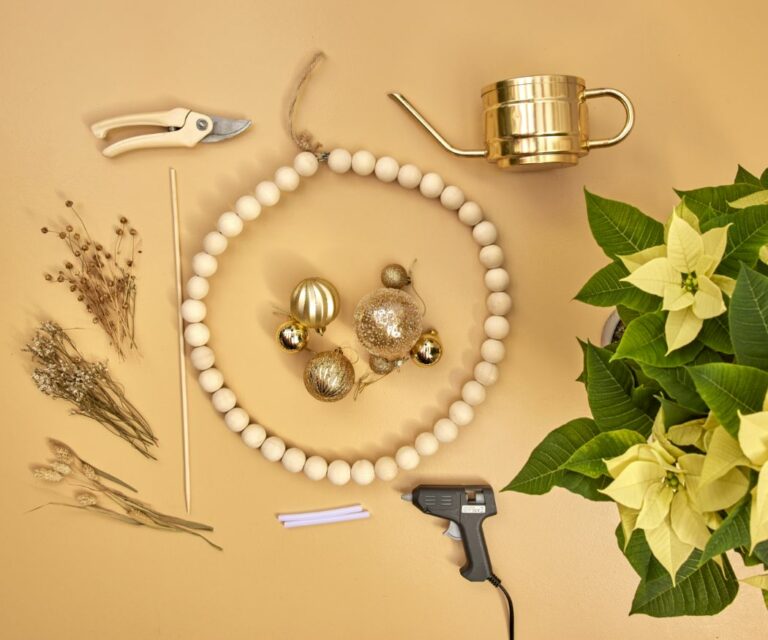
What you’ll need
• A decorative metal ring of natural wooden beads, 25-30cm diameter
• A wooden stick
• Hot glue gun and glue sticks
• Golden baubles in various sizes and designs
• Several cream mini poinsettias or one larger poinsettia
• Dried flowers
• Secateurs
• Small watering can or beaker for filling the baubles
• A glass of hot water, about 60°C
• A glass of cold water
How to do it
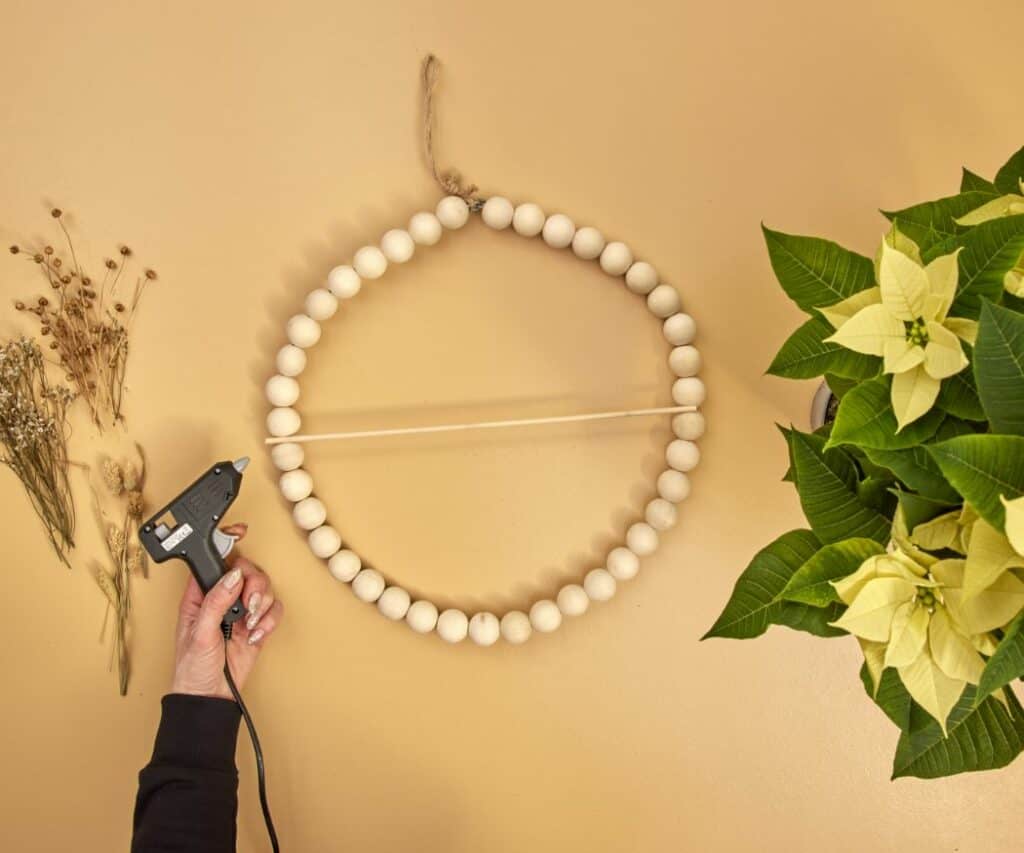
- Attach the stick
Use hot glue to attach the wooden stick horizontally between the beads across the centre of the bead ring. This will serve as the base for the rest of the decorations. - Attach the baubles
Remove the hangers from the baubles and glue them along the wooden stick. Leave the glue to set completely. - Prepare the bauble vases
Place dried flowers in the smaller baubles. Carefully fill the larger baubles with room-temperature water. - Cut the poinsettias
Cut off individual stems with attractive bracts. Dip the cut ends into the hot water for about five seconds, then immediately into the cold water. This prevents the milky sap escaping. - Finish the wreath
Place the prepared poinsettia stems into the water-filled baubles. Hang the wreath on a door, wall, or window.
Tip: Avoid annoying strings of glue
Allow the hot glue gun to heat up completely and apply the glue as evenly as possible. If fine strings of glue do form, leave them to cool down first, then carefully peel them off. Stubborn strings can be softened slightly with warm air from a hairdryer to make them easier to remove.
Wired juniper hanging decoration
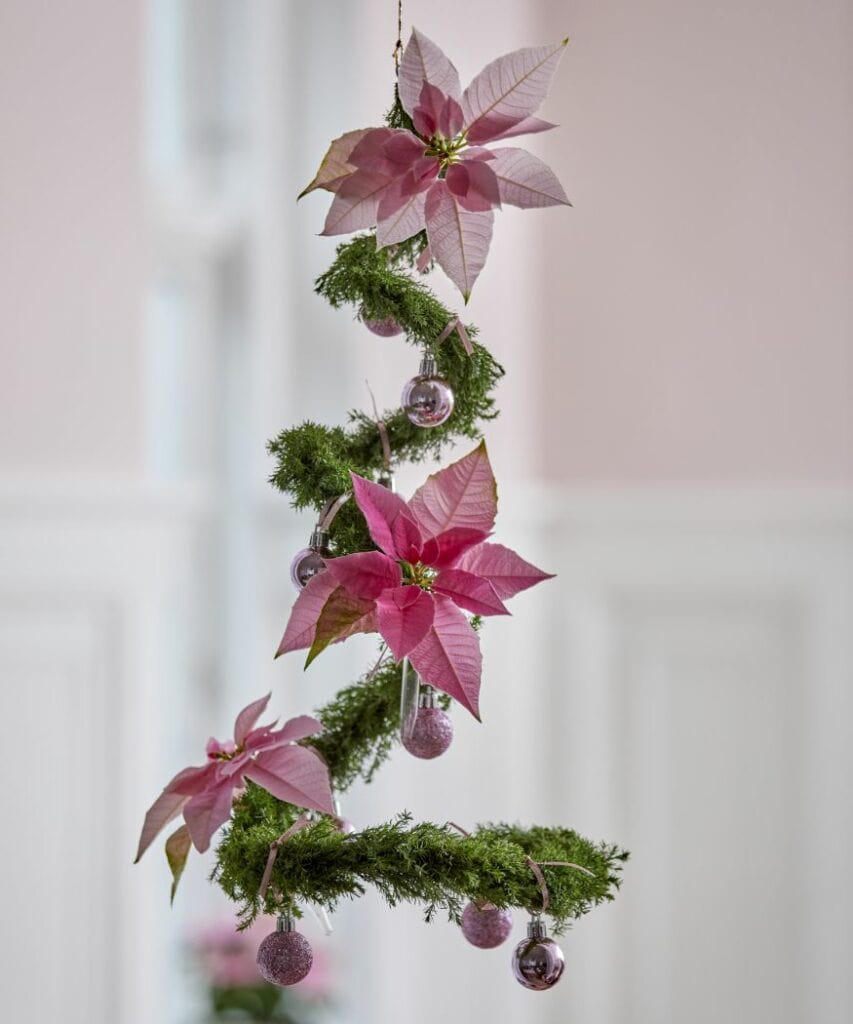
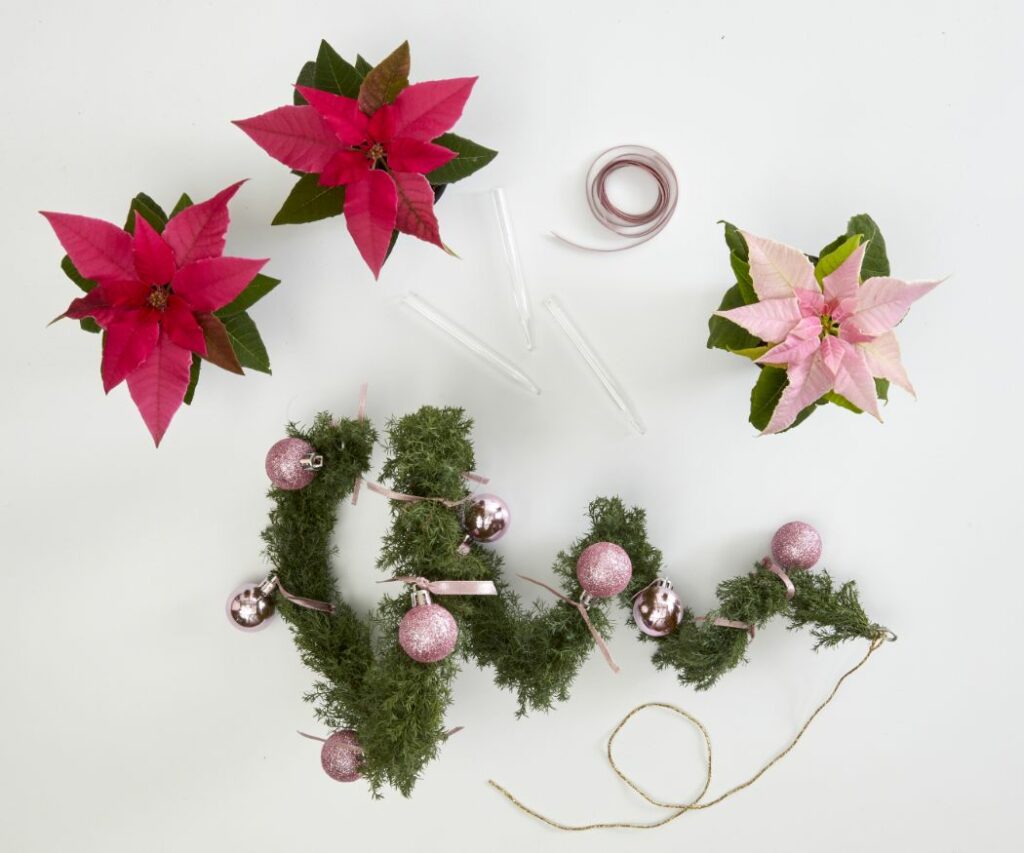
This hanging decoration doesn’t take up any floor or wall space. A wire spiral wrapped in juniper forms the silhouette of a Christmas tree and can be hung anywhere in the room during Advent. Adding mini baubles and cut poinsettias creates a festive atmosphere above a table, sideboard or in front of a window, for example.
What you’ll need
• Craft or decorative wire, 1-2mm thick
• Wire cutters
• Flat-nose pliers
• Juniper stems
• Mini baubles
• Twine or ribbon
• Binding wire
• Three test tubes
• Three mini poinsettias
• Secateurs
• A glass of hot water, around 60°C
• A glass of cold water
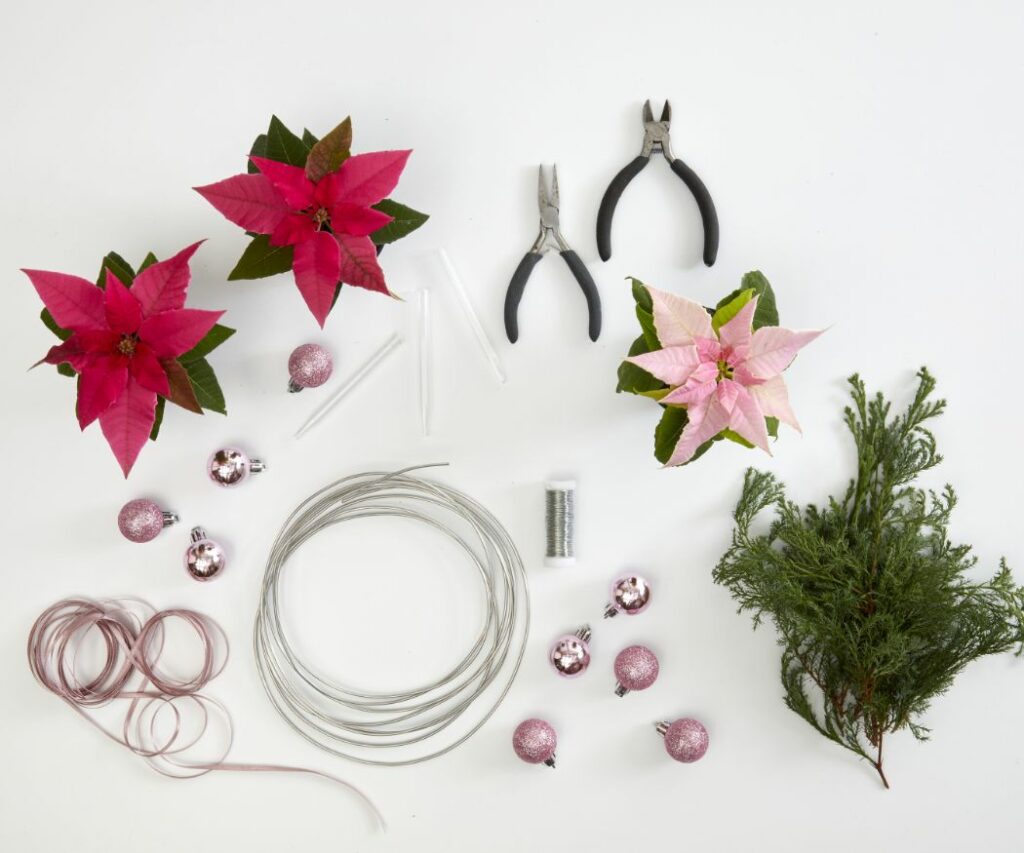
How to do it
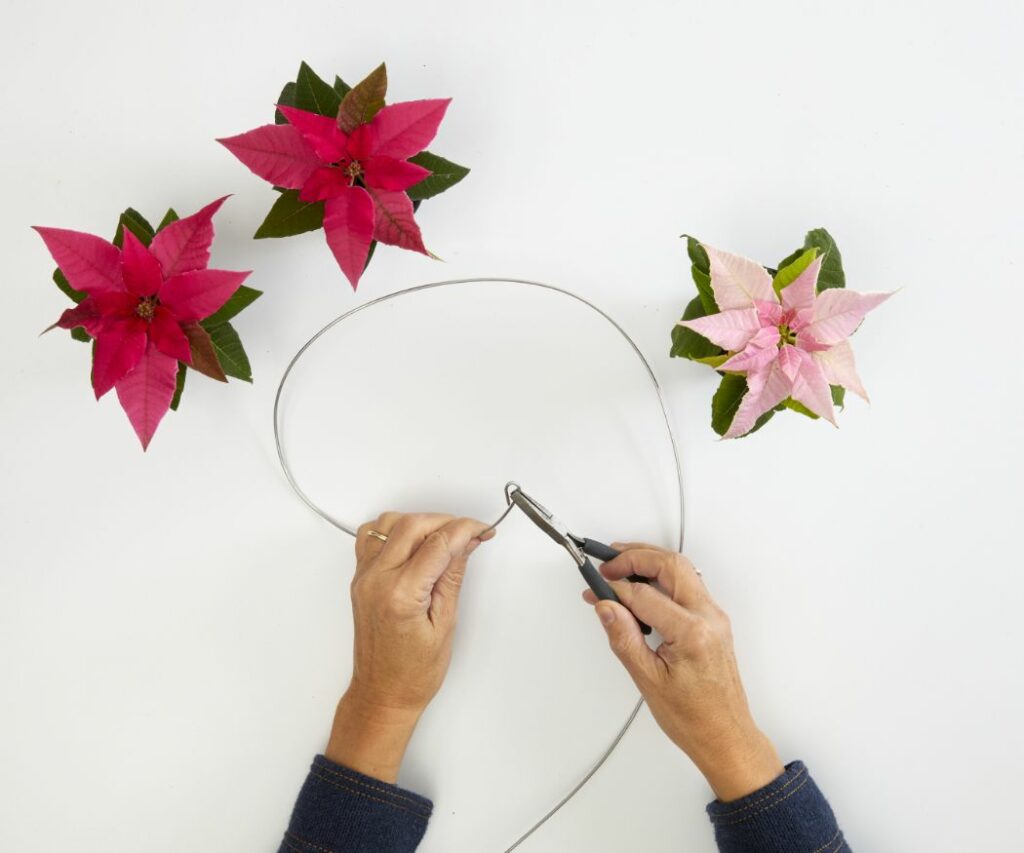
1.Shape the hanger
Cut a length of craft wire 50-60cm long. Using flat-nose pliers, bend a small loop at one end, which you will hang the finished decoration from later on.
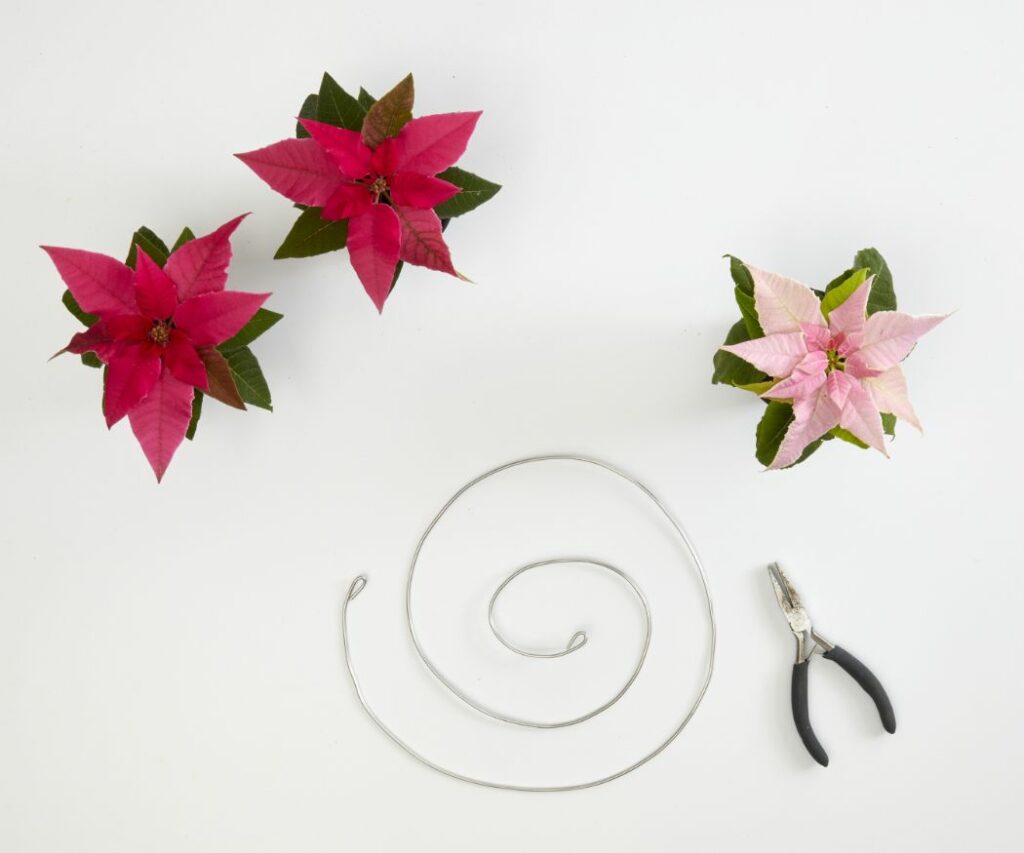
2.Form the wire spiral
Starting from the loop, shape the wire into a spiral. The coils should get larger towards the bottom, creating the typical shape of a Christmas tree.
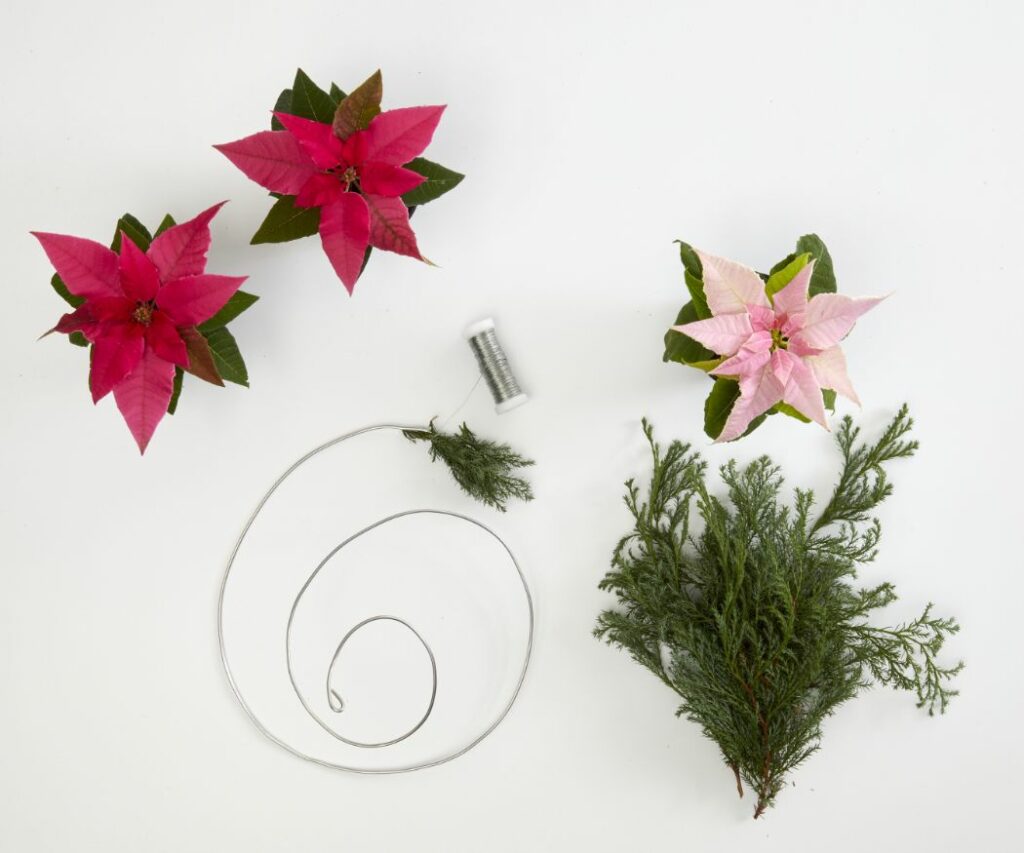
3.Attach the juniper
Cut the juniper stems into smaller pieces. Place them around the wire one by one and secure them with the binding wire. Start at the bottom of the spiral and work your way up to the loop.
4.Attach the baubles and test tubes
Secure the baubles and test tubes to the spiral with ribbon or twine. Arrange them so the structure hangs as level as possible.
5.Add the poinsettias
Fill the test tubes with room-temperature water. Cut three stems from the mini/large poinsettias and dip the cut ends into the glass of hot water for 5 seconds, then straight into the one of cold water. Place one stem in each test tube.
6.Hang the decoration
Hang the wire spiral from a hook in front of a window, above a table or suspended in the room.
Tip: Cover the wire evenly with the foliage
To ensure the wire spiral is completely covered, place the juniper pieces so they overlap slightly, covering the ends of the previous sprig with each subsequent one. Keep the wire taut while binding and always work in the same direction. This makes sure the greenery is secure and the spiral looks even.
From mini to large: poinsettias to suit any space
Poinsettias are not only available in red. Depending on the variety, their bracts can be white, cream, pink, rosé, salmon or apricot, and there are also two-tone varieties. When it comes to size, there is also a wide choice: mini poinsettias fit on narrow windowsills, small tables or in hanging decorations, while larger plants need a little more space.
➡️ Mini poinsettias: the best care, buying and decoration tips
Poinsettias can be used as both pot plants and cut flowers. This means they suit a wide variety of decorative styles, from classic to minimalist to modern. The poinsettia has a long tradition as a Christmas plant: its history and significance extend far beyond its role as a festive decoration. The only thing poinsettias don’t provide is the traditional Christmas scent, which comes from biscuits, fir branches and spices.
➡️ Poinsettias are so versatile!
Want to find out more and get some great Christmas decoration inspiration? Just take a look at our decorating tips.