 English
 Dansk
Dansk Deutsch
 English
 Español
 Français
 Hrvatski
 Italiano
 Magyar
 Nederlands
 Norsk
Norsk Polski
 Română
 Slovenský
 Slovenščina
 Suomi
Suomi Svenska
 Čeština
 Ελληνική
 Български
Do you love homemade Christmas decorations but have limited space? The solution: decorate with mini poinsettias! They’re small and offer endless possibilities for creative decoration projects at home.
In this article, we’ll show you 5 easy and inexpensive craft ideas for using mini poinsettias to create a festive atmosphere in even the smallest corner of your home – including step-by-step instructions you can follow right away.
Did you know that the colourful ‘flowers’ of the poinsettia are actually bracts? These special leaves make the plant, also known as the Christmas star or Advent star, the versatile showstopper we love so much in winter. As well as a pot plant, they can also be used as a cut flower. For simplicity’s sake, we sometimes refer to cut poinsettias as ‘cut flowers’ or ‘flowers’, although it would be more accurate to say ‘cut stems’.
Contents
- Crafting with wire: old coathanger tree
- Crafting with natural materials: homemade mini poinsettia twig star
- Crafting with wood: Christmas tree-shaped wall display
- Crafting with beads: Christmas wreath with gold baubles
- Hanging decoration idea: Mini poinsettia Advent spiral
- Versatile poinsettias
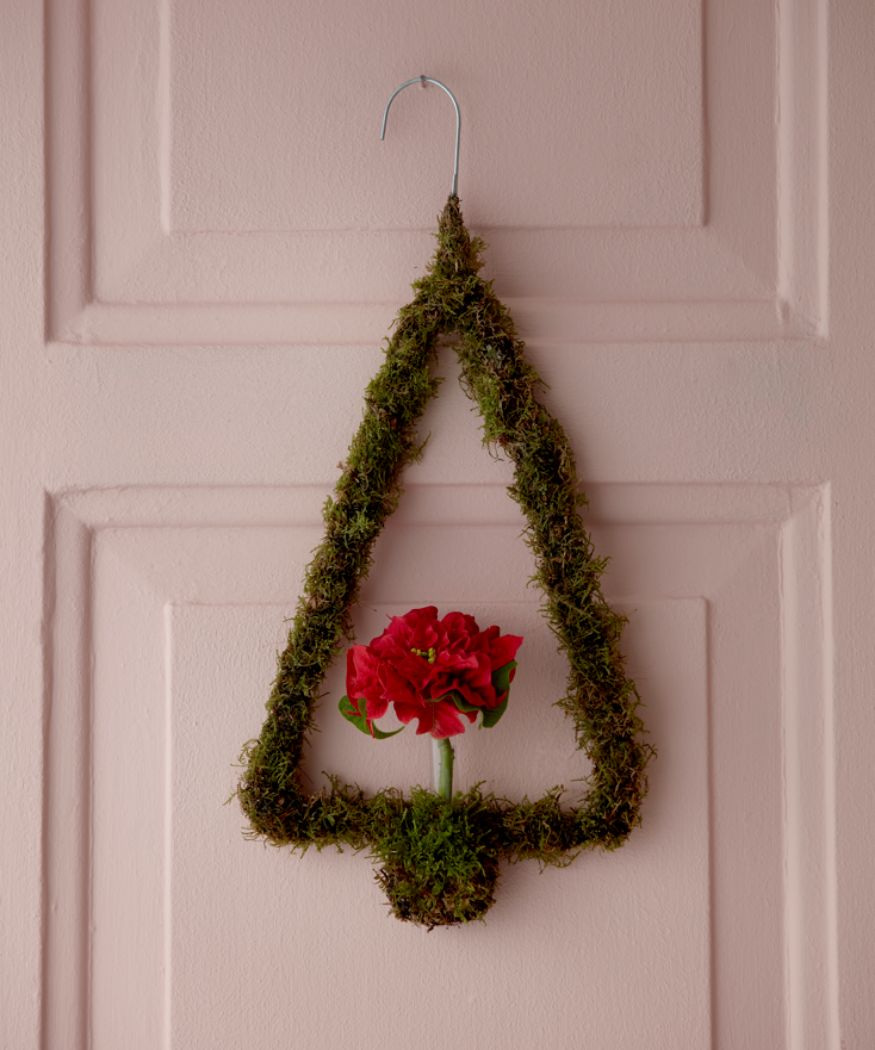
Crafting with wire: old coathanger tree
This small homemade Christmas tree is affordable for everyone, takes up very little space and still brings instant festive cheer to your home. Made from a simple wire hanger, you can add moss and a cut mini poinsettia to create a minimalist Christmas tree look.
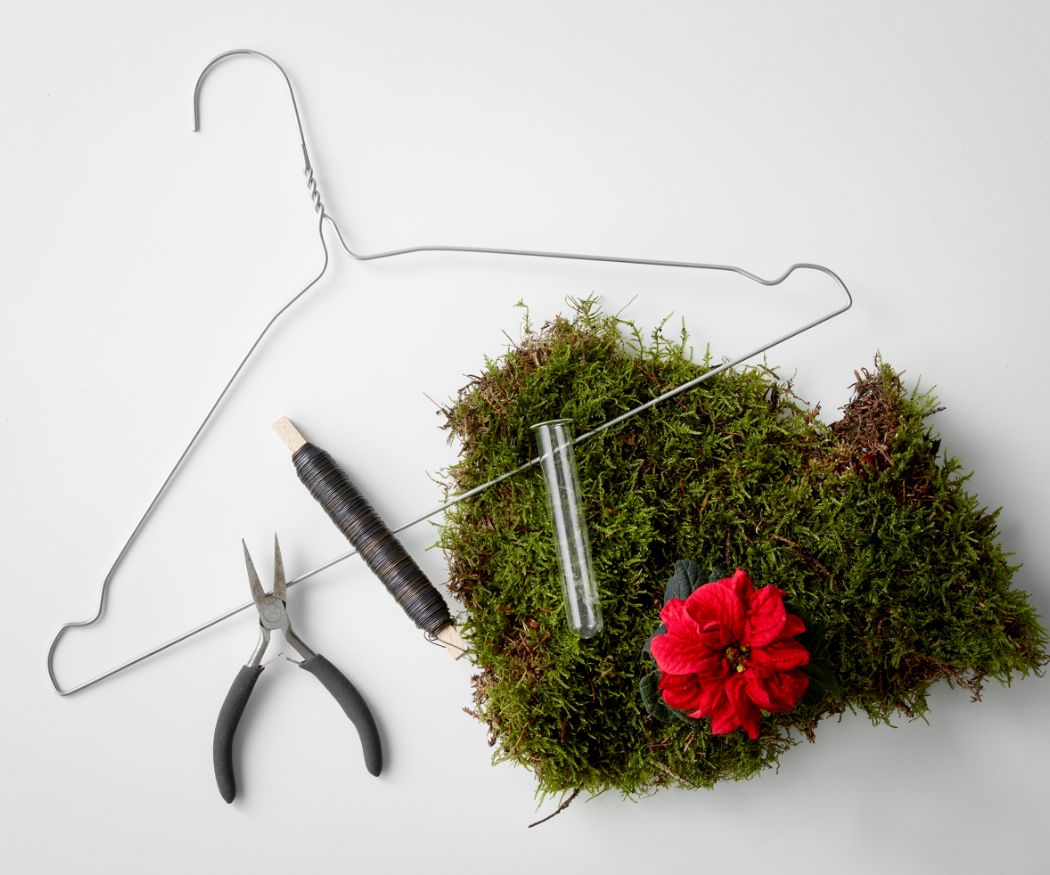
Materials
• wire coathanger
• moss
• cut poinsettia
• test tube
• craft wire
• pliers
• a glass of water at about 60°C
• a glass with cold water
Step by step instructions
1. Shape the coathanger
Use the pliers to bend the wire hanger into the shape of a Christmas tree. Leave the hook at the top intact so you can hang the decoration from it later.
2. Attach the moss
Gently wrap the wire frame with the moss. Use the craft wire to secure the moss and distribute it evenly around the entire Christmas tree form. Make sure there are no gaps so the ‘tree’ looks nice and even.

3. Attach the test tube
Attach the test tube to the ‘trunk’ of the tree, again using craft wire. Alternatively, attach it to the top and let it hang in the space in the middle of the frame.
4. Insert the mini poinsettia
Cut the stem of the mini poinsettia from the plant and remove the bottom leaves if necessary. Dip the stem end briefly into the glass of hot water, then into the cold water to stop the sap. Fill the test tube with fresh water and place the poinsettia in it.
You can now hang your Christmas decoration on a door frame, window or wall. The vibrant poinsettia adds an immediate festive touch.


Tip: Collecting moss – something to watch out for
If you are going to collect your own moss only take it from it from clean areas (not along your neighbour’s dog-walking route!). Important: In many areas, collecting moss is only allowed in small quantities and for personal use. Some types of moss are protected and cannot be collected. Check local regulations before you go.
Crafting with natural materials: homemade mini poinsettia twig star
Add a natural touch to your home with this twig star. It’s easy to make and looks beautiful on a door, wall or window. The cut mini poinsettias add a pop of colour. A perfect idea for those who like things simple and creative. Perfect for a small space too!

What you need
• 5 sturdy, lichen-covered twigs (or dried twigs)
• moss
• 3 mini poinsettias
• string
• gold wire
• scissors

Craft instructions for the poinsettia star
1. Form a star
Lay the five twigs together to make a star shape. Tie the ends together with string to keep the form stable. Make sure the twigs are bound tightly where they touch so nothing slips.
2. Add the moss
Carefully remove the small poinsettias from their pots, after watering them in an immersion bath. Wrap the rootballs with moss and secure with the gold wire.


3. Arrange the poinsettias
Use wire to attach the poinsettias balls to different points on the twig star.
4. Hang up
Hang your rustic homemade display of colourful mini poinsettias in a bright place away from draughts.


Tip: Poinsettias as mini kokedamas
Kokedamas are a creative and decorative way of presenting plants that originated in Japan. The term ‘kokedama’ translates as ‘moss ball’ and describes exactly what these works of plant art are: Moss-encased compost balls.
Kokedamas need watering regularly. Fomr time to time, immerse the moss balls in a container of room temperature water until no more bubbles appear. Then allow them to drain well before hanging back up again.
?? For more tips on caring for mini poinsettias, see our article: Mini poinsettias: Top tips for care, buying and decorating.
Crafting with wood: Christmas tree-shaped wall display
This homemade wall display combines rustic wood with vibrant mini poinsettias to create a cosy atmosphere. The branches are screwed together to form a tree and the poinsettias add a touch of colour. This design is perfect for adding a festive and natural touch to a blank wall or room. Guaranteed needle-free and simple to make.

List of materials
• cordless screwdriver and screws, including one long screw, about 7cm long
• a large wooden panel (e.g. old door)
• two longer and two shorter branches
• Coarse twine
• Fine twine
• Small terracotta pots
• Mini poinsettias
• Cones, wooden stars and clematis vines to decorate
Step by step instructions
1. Saw and screw the branches
Saw the branches to the correct length for the size of tree you wish to make, arrange them in the shape of a Christmas tree and screw together. Cover any visible screwheads by wrapping the branches with the coarse twine.
2. Create a framework
Tie four lengths of coarse twine horizontally across the tree structure at regular intervals.


3. Position the panel
Place the wooden panel in its final location and find the centre point of its top edge. About 5cm below this point, add the long screw, leaving about 2cm of screwthread visible. Hang the tree structure from it. It is now ready to decorate.
4. Decorate the tree
Attach the terracotta pots to the horizontal rows of coarse twine, using the finer twine. Wrap it around the pots and twist the ends on both sides. Place a mini poinsettia in each pot and decorate the tree with cones, wooden stars and clematis vine.


Tip: Proper use and maintenance of natural materials
To ensure the longevity of your wall design, make sure the branches, vines and cones are prepared thoroughly. Brush them carefully to remove dirt and small debris. Once these natural materials are dry, they will last longer and you can seal them with a coat of clear varnish to make them more durable.
Crafting with beads: Christmas wreath with gold baubles
This glamorous beaded wreath combines classic Christmas decorations with modern elements. The gold baubles and pale mini poinsettias add a nostalgic touch. Perfect for adorning an inside door, over the dining table, in a window, individually or in groups, it creates a festive atmosphere.

Materials
• decorative metal ring of natural wooden beads (diameter 25-30cm, available readymade)
• wooden kebab stick
• hot glue gun and glue sticks
• gold baubles in different sizes and designs
• several cream mini poinsettias or a large poinsettia with several heads
• secateurs
• dried flowers
• watering can
• a glass of hot water about 60°C
• a glass of cold water
Crafting instructions
1. Add the cross brace
Using the hot glue gun, glue the wooden kebab stick horizontally across the centre of the wreath between the beads. This gives the wreath stability and provides a base for the decorations.
2. Attach the baubles
Remove the caps from the baubles then attach them along the kebab stick, using hot glue. Choose baubles in different sizes to give the wreath more variety. Allow to dry.


3. Fill the baubles
Add room temperature water to the larger baubles. Fill the smaller baubles with sprigs of dried flowers.
4 Arrange the cut poinsettias
Use secateurs to cut the stems of the mini poinsettias or individual stems with bracts from a larger poinsettia. Dip the cut ends into the glass of hot water for about five seconds and then immediately into the cold water to stop the sap flow. Then insert the stems into the water-filled baubles. Finally, hang up your creation and you’re done!


Trick: Tips for working with hot glue
When using a hot glue gun, it can often produce fine threads that make the end result look messy. Here are a few simple tricks to avoid this: Make sure the glue gun is fully heated before you start using it. Glue that is too cool tends to create threads, as does glue that is too hot. Squeeze the trigger evenly and release the gun slowly for a clean result. If threads do form, allow them to cool and carefully remove them with your fingers. Alternatively, you can warm them slightly with a hairdryer. This will soften them and make them easier to remove.
Hanging decoration idea: Mini poinsettia Advent spiral
This hanging spiral decoration looks light and delicate, making it perfect for small rooms. Despite its space-saving size, its special shape and bright mini poinsettias will catch everyone’s eye and create a festive atmosphere. A charming decoration that is both stylish and modern.

What you need
• craft wire (1-2mm thick)
• wirecutters
• flat nose pliers
• juniper branches
• mini baubles
• twine or ribbon
• a reel of fine silver wine
• three test tubes
• three mini poinsettias
• secateurs
• a glass of hot water about 60°C
• a glass of cold water

Instructions: step-by-step
1. Form the loop
Use the wirecutters to cut a 50-60cm length of wire, then use the flat-nose pliers to make a small loop at one end for hanging.
2. Shape the frame
Starting from the loop, bend the wire into a spiral, circle by circle, using the flat-nose pliers.


3. Attach the juniper
Cut the juniper branches into small sprigs with the secateurs. Starting at the end of the spiral and working towards the loop, cover the wire evenly with the juniper sprigs and bind in place with the silver wire.
4. Add baubles and test tubes
Attach the mini baubles and test tubes to the juniper-wrapped wire using ribbon or twine. Make sure they are evenly distributed to create a balanced look.
5. Place the poinsettias
Fill the test tubes with room temperature water. Cut the mini poinsettia stems with the secateurs. To keep the stems fresh for up to two weeks, immerse the cut ends in the glass of hot water for about five seconds and then in the cold water. glass Place a stem each in your test tubes.
6. Position your decoration
Hang your mini Christmas tree wherever you like, for example in front of a window, over a table or in a room where it can float freely.
(Follow the link for Christmas table decoration ideas)
Trick: Attach foliage with wire like a pro
There’s a tried and tested technique to ensure that juniper sprigs or any other natural materials are held evenly and firmly in place with wire:
Start at one end of the base wire and gradually wind the binding wire around it. Lie the sprigs so they overlap slightly and the foliage of the new piece covers the stem end of the previous one. This gives an even, full result.
Use florists’ wire or fine silver wire to secure the sprigs. Keep your binding wire taut as you wrap it around the sprigs. This will ensure the foliage stays in place and doesn’t slip. Pull the wire tight after each wrap and always place the sprigs in the same direction for a neat and even look.
Have you recreated one of our ideas? Share your creation on Instagram using the hashtag #ChristmasdecoDIY and let us see how you decorate your home for the festive season!
The versatile poinsettia
Poinsettias come in a variety of shapes, sizes and colours that go far beyond the classic red star shape. From mini poinsettias, perfect for small spaces or table decorations, to large specimens that make a striking statement in a room. As well as the traditional red varieties, there are white, cream, pink, cerise, salmon, apricot and even bicoloured varieties. They can all be used as pot plants or cut flowers. The versatility of poinsettias makes them ideal for all types of Christmas decorations – whether classic, modern or minimalist. Festive atmosphere guaranteed! All you need is a touch of Christmassy scent with biscuits.
Want to find out more about poinsettias and get some great ideas for inspiration? Just take a look at our decorating tips and follow us on Facebook, Instagram, Pinterest or YouTube!