 English
 Dansk
Dansk Deutsch
 English
 Español
 Français
 Hrvatski
 Italiano
 Magyar
 Nederlands
 Norsk
Norsk Polski
 Română
 Slovenský
 Slovenščina
 Suomi
Suomi Svenska
 Čeština
 Ελληνική
 Български
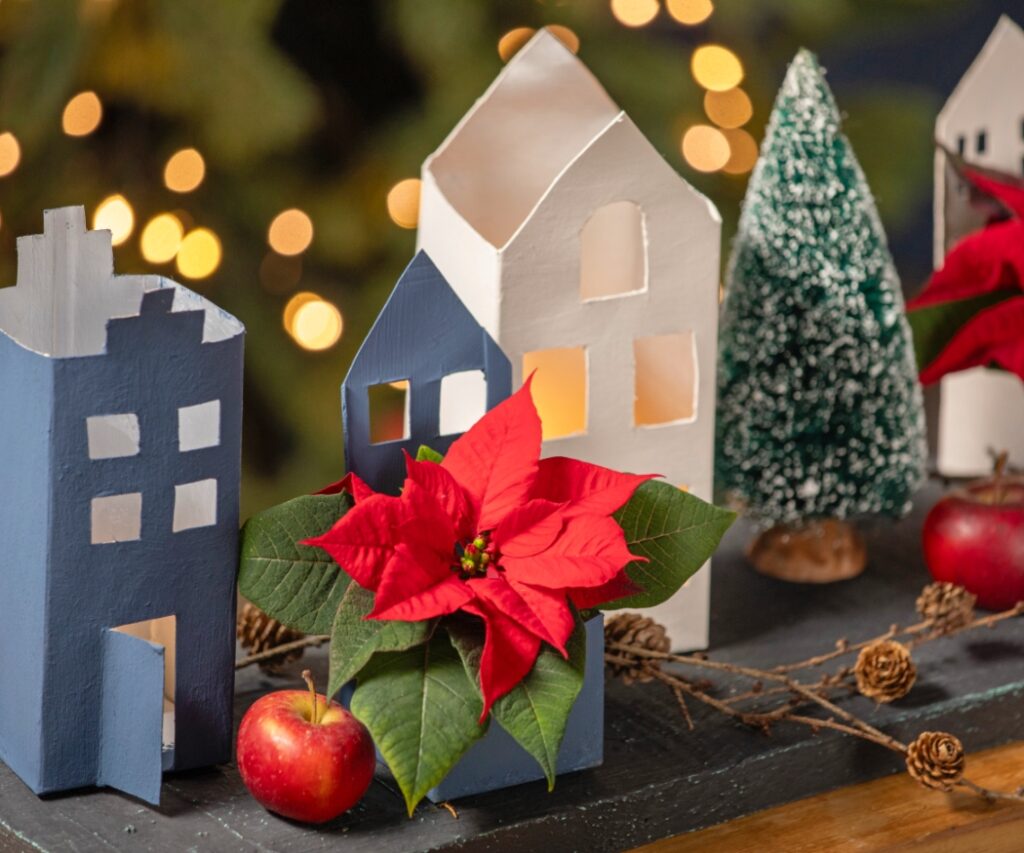
Christmas crafts with children can be both beautiful and simple. For example, you can create a Christmas village from empty drinks cartons, paint and mini poinsettias. This sustainable craft activity is suitable for children aged three and over and is a great way to create special family moments at Christmastime.
Imagine this: You and your children are crafting together. They’re full of enthusiasm, and at the end of it, you have a beautiful homemade Christmas village displayed on the windowsill while the first snowflakes dance outside. This craft project is perfect for relaxed family afternoons. It’s quick to prepare, safe, and the result is stunning. It’s suitable for children of nursery and primary school age, who still need a little help from mum or dad.
Want to see how to make this homemade Christmas village, step by step? Watch the video instructions now to find out!
- Homemade Christmas village craft project: Step-by-step instructions
- Tip: Christmas village as a gift
- Stress-free crafting as a parent
- Age recommendations: How to get everyone involved in Christmas decorations
- When things don’t go as planned
- 5 parent hacks for relaxed crafting
- If you’re looking to expand your creative ideas, take a look at these
- What you really need (and what you can save on)
- Why crafting is good for children
- The tradition of Christmas villages
- FAQs about Christmas village crafting
- Keep your mini poinsettias looking beautiful for weeks
Homemade Christmas village materials list
Basic materials:
- Empty drinks cartons
- Mini poinsettias
- Acrylic or interior paint with CE mark
- Wooden board or tray as a base
- Moss (fresh or dried)
- Battery-operated LED tealights
To protect against moisture and paint:
- Small freezer bags for the plant pots
- Newspaper or plastic sheeting for the crafting area
Craft tools:
- Pencil for sketching
- Brushes in different sizes (large for younger children, fine for older ones)
- Children’s scissors
- Craft glue (for moss or light decorations)
For older children (aged 7+) and adults only:
- Utility/craft knife
- Hot glue gun & glue sticks
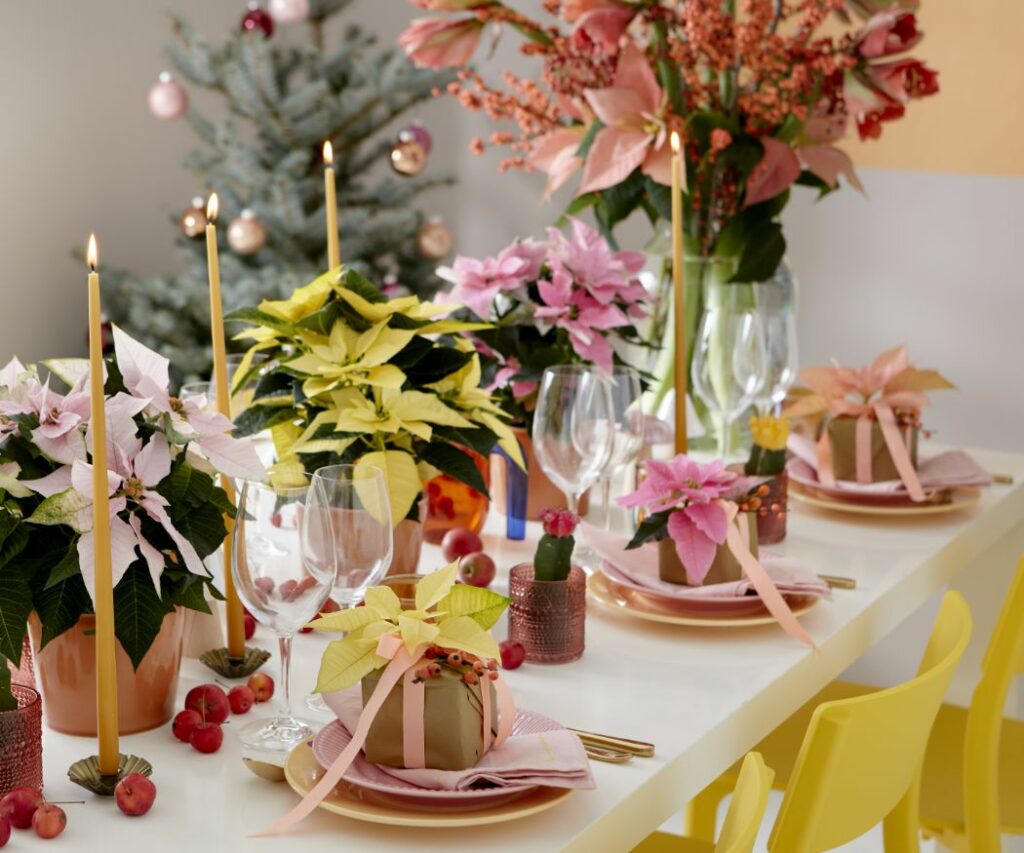
💡 Tip: Mini poinsettias come in many colours, from classic red to pink and delicate cream tones.
Time required & age recommendations
Depending on the number of houses, this project takes 1-2 hours. Children aged three and over can help with painting and moss decoration. Pre-school children can sketch and make things with children’s scissors. From the age of about seven, children can work largely independently but should only use sharp tools under supervision.
💡 Tip: Use the drying times to have a mug of cocoa and biscuits. This keeps the crafting stress-free.
Step-by-step instructions for your homemade Christmas village
1. Prepare the drinks cartons
Thoroughly rinse the empty cartons with warm, soapy water until no residue or odour remains. Leave them to dry completely, including the corners, to prevent mould forming.
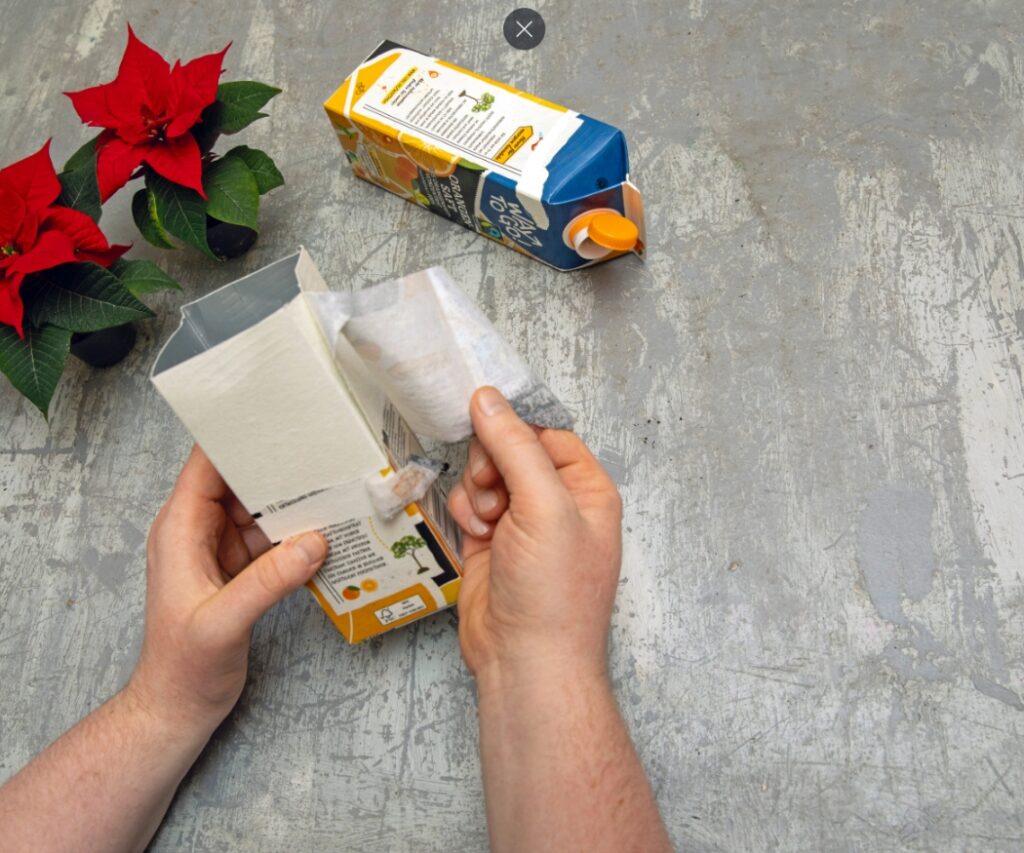
Once dry, cut off the folded ‘roof part’ at the top to create open boxes. The most important part comes next: carefully remove the printed outer layer. Many drinks cartons consist of several layers, and the coloured, printed paper can usually be peeled off from one corner. Underneath is white cardboard, which is much easier to paint on.
If the paper doesn’t come off easily, you can also prime the surface with white paint. Do a test beforehand to check whether your paint adheres well.
2. Design the houses
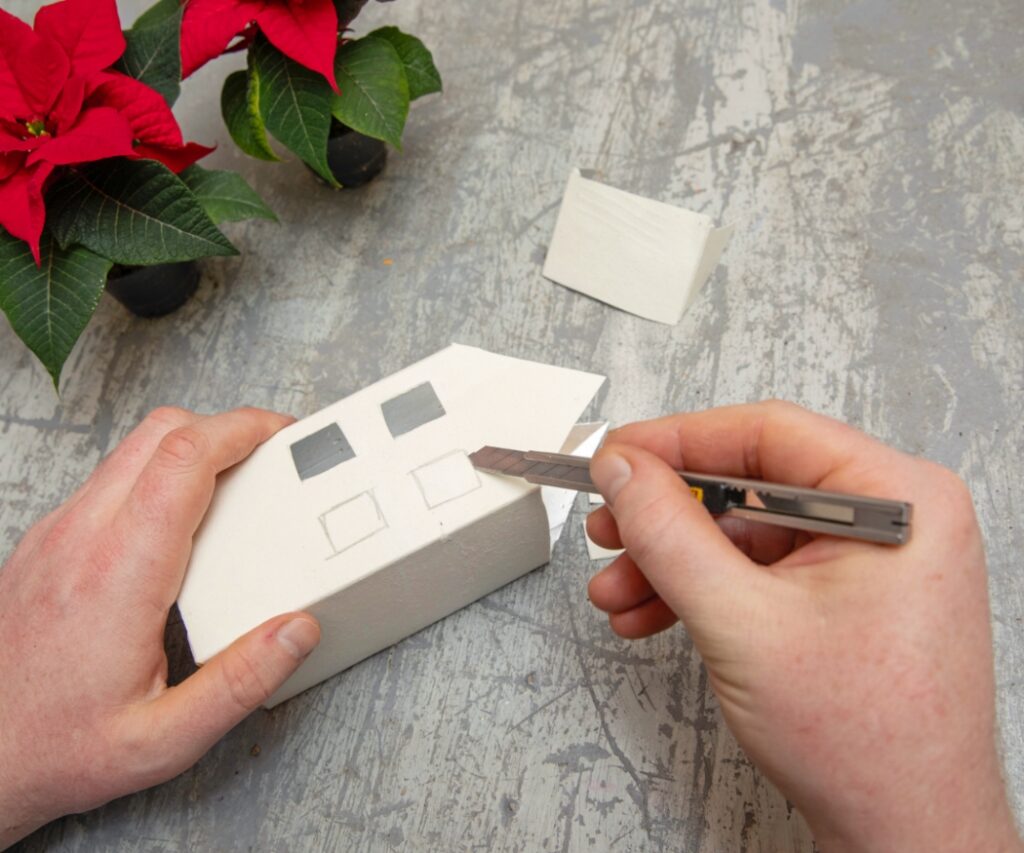
Use the pencil to draw windows, doors and a roof on the drinks cartons. Discuss with the children: Should the windows be round or square? Where should the door go?
Plan two different house designs.
Houses for tealights: Cut small windows (approx. 2 x 2cm) into the side walls. Later, you will place the LED tealights inside. The light will shine through the windows and create a cosy glow. This is an easy way to make atmospheric cardboard lanterns.
Houses for plants: Cut out three of the side walls, leaving a ‘tray’ roughly the height of your mini poinsettia pot. This creates an open container, with the remaining side forming the façade.
🚨 Important: Using a utility/craft knife can be dangerous. If children aren’t familiar with using one, an adult should take over. Little ones can cut out the decorations with child-friendly scissors.
3. Paint the houses
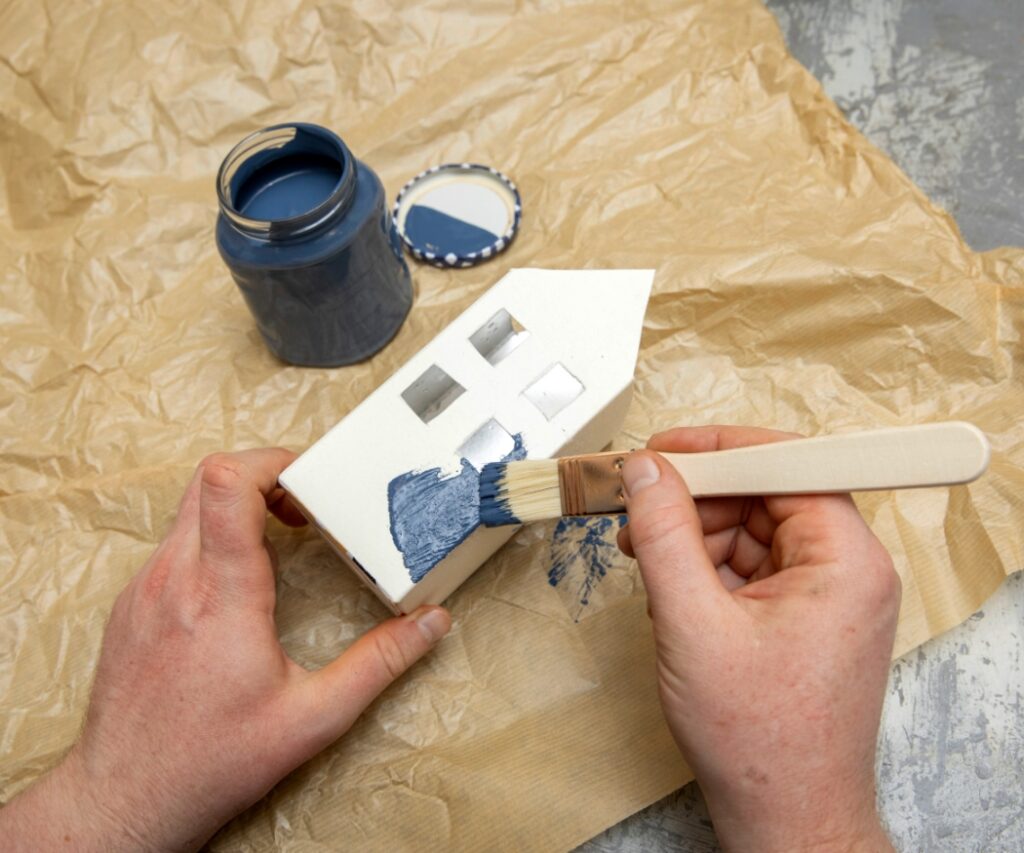
Cover your work table with newspaper or plastic — it’s time to get colourful! Use non-toxic acrylic or CE-labelled interior paint. Children can design their houses as they like, with red roofs, blue walls, colourful doors, or anything else they can think of. Let their imagination run wild! To create striking details, make simple cardboard stencils of shapes such as stars, Christmas trees or snowflakes and use them as a colouring aid.
💡 Tip for drama-free painting: Let each child design their own house and give them their own brushes and paints. This avoids arguments and waiting time. Large brushes are ideal for three to four-year-olds, while smaller ones are better for older children and finer details.
Leave the houses to dry completely after painting. Depending on the number of coats, this will take 30-60 minutes. If you are planning to apply several coats of paint, it’s better to apply two thin coats than one thick one.
4. Place the mini poinsettias
Water the plants thoroughly before placing them in the pots, and make sure they drain well (poinsettias don’t like to be soggy).
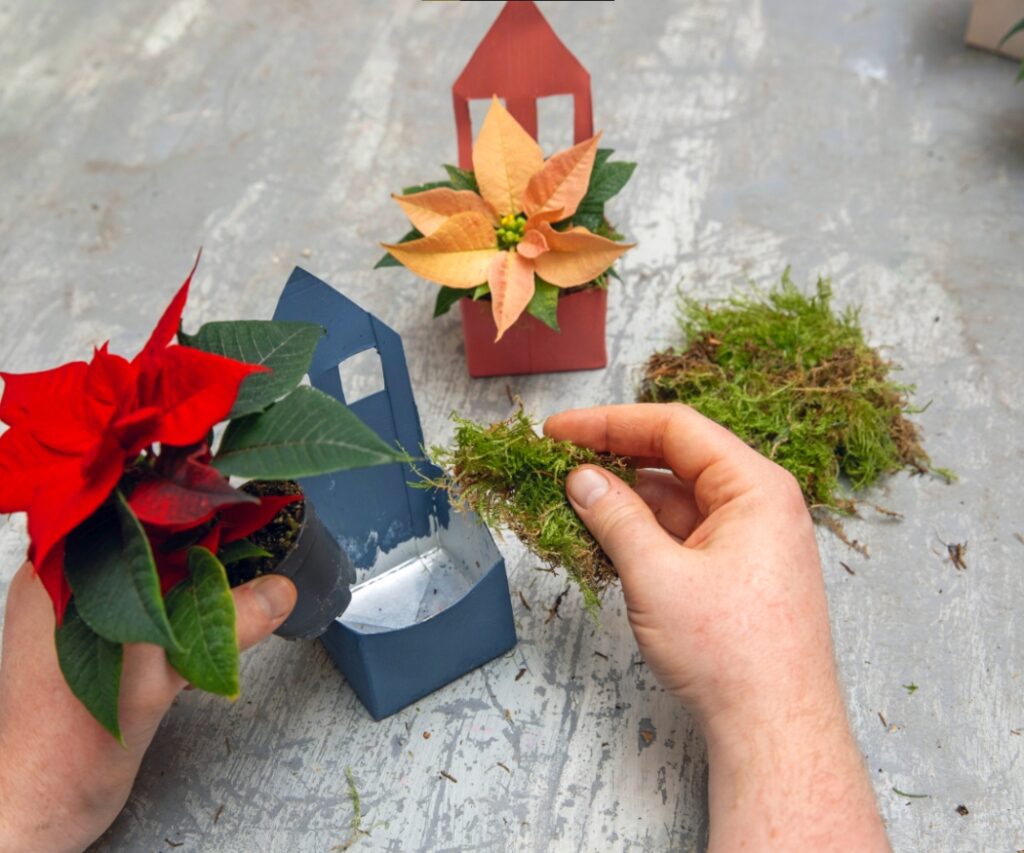
Before moving the plants into their little homes, protect the houses from moisture. Place each pot in a small freezer bag or line the inside of the cartons with aluminium foil. Although drinks cartons are usually leakproof, it’s always better to be safe than sorry.
Fill the base of the open planters with moss. This looks natural and supports the pots. Place each mini poinsettias in its pot inside a house, then cover the pot with more moss until it is no longer visible.
🔗 Care tips for mini poinsettias – how to keep them looking beautiful for longer
5. Set up the Christmas village
Now comes the best part: arranging all the houses on the wooden board, both the illuminated ones and those with mini poinsettias. Try different layouts until you are happy with the look of your little village. Children often come up with the most creative ideas.
Fill the spaces in between the houses with larch sprigs, ornamental apples, and small decorative Christmas trees. If a house is wobbly, a drop of hot glue will secure it to the board. However, the weight of the boxes is usually sufficient.
Finally, place LED tealights in the little houses, using models with a timer, if possible. When all the windows are lit up in the evening, it creates a beautiful festive atmosphere that’s homemade, safe and beautiful. Your Christmas village will also look great on a bench or windowsill.
Tip: Christmas village as a gift
Why not give your Christmas village as a gift? To protect the plants from the cold, wrap the little houses and poinsettias in newspaper or other soft packaging material and tie it up with string. Place the parcel in a sturdy cardboard box for transport.
Important: Poinsettias need protection below 12°C. They are very sensitive to cold and will quickly lose their leaves if not wrapped up.
Want to watch the instructions again? This video shows you all the steps in detail.
Stress-free crafting as a parent
A successful craft project needs two crucial things; good preparation and the right attitude. Read on for our four tips to make your crafting experience more enjoyable:
- The right time
Please don’t start just before lunch, when everyone is hungry, or in the evening, when children are tired. The best time is usually mid-morning or mid-afternoon. This is when energy levels are high and family mode is activated. - Important: Protect clothing!
Put on old clothes and roll up your sleeves! Good things to wear for crafting are ones that can cope with some paint. For small children, use one of Dad’s old T-shirts as a painting smock. Wash out fresh splashes of acrylic paint with cold water – warm water will just ‘boil’ the paint and set it. Vinegar or isopropanol can help with dried-on stains. Alternatively, simply call the shirt a ‘crafting artwork’! Unfortunately, water-based colours that are easy to wash out, don’t last well on cardboard. - Have realistic expectations
Not every house you craft will look like something from Pinterest. Maybe the whole building will be painted red instead of just the roof – that’s fine! Or maybe it will end up covered in Christmas stickers from top to bottom – that’s great too! The important thing is the fun, not the end result. Take photos of the crafting process: little hands covered in paint, the first window decorated, the final ‘wow’ moment. And if the village looks a bit scruffy after two weeks? Then bring that mishap to life with a story for your children. Maybe a storm raged over the village? Or maybe it’s just time for a renovation. - Have an exit strategy
If a child no longer feels like crafting, let them take a break. No pressure, no drama. Many children come back of their own accord when they see others are continuing. Some tinker for hours, while others only manage ten minutes. Either is fine. The most important thing is that everyone has fun.
🎶 Tip: Put on your favourite Christmas songs!
Christmas music makes everything easier, especially crafts. Put together a child-friendly playlist of Christmas songs that everyone likes. How about European festive classics such as, ‘In Der Weihnachtsbäckerei’, ‘Petit Papa Noël’, ‘Nu tändas tusen juleljus’ or ‘Campana sobre campana’? This will make crafting more fun as well as taking you on a short musical journey through Europe’s Christmas traditions.
The poinsettia is also part of European Christmas tradition. Its vibrant bracts symbolise light and hope during the dark winter months. In this homemade Christmas village, it becomes a symbol of European creativity, tradition and family time. Wherever you are, poinsettias bring the Christmas spirit into your living room.
Age recommendations: How to get everyone involved in Christmas decorations
Ages 3-4:
Young children love spreading paint with big brushes, even if it means turning the whole house one colour. Provide them with their own bowl of paint, a thick brush and a designated crafting area. Other favourite tasks include: pushing moss into the corners of the houses and placing apples or twigs on the board. Once they’ve finished, they can paint Christmas cards. After a while, they will probably want a break, so plan for this.
Ages 5-6:
Now the real helpers can get involved! They can sketch out windows, cut out small shapes and arrange the houses. Give clear instructions such as, ‘Where does the red house go?’ Or, ‘Can you clean up the brushes?’ so they feel taken seriously and proud to be involved.
From 7 years+:
Things get more productive at primary school age. They can make their own design decisions, guide younger siblings, and actively help with setting up and tidying up. They often have great ideas for the final touches (such as Christmas snowflake motifs on the house facades) and will keep track of everything.
💡 If there are several children, try this tip: Each child gets ‘their’ house. This avoids arguments, boosts self-confidence, and turns the Christmas village into a collaborative project with lots of individual contributions.
When things don’t go to plan
When crafting with children, things rarely go according to plan. Anything that goes wrong becomes part of the experience. But it’s these moments that create the best memories. Years later, people will still be talking about ‘the Christmas when your daughter painted the whole village pink’.
Does your child suddenly want to stop?
This often happens after 20 to 30 minutes. Just say, ‘Take a break. I’m going to make some more.’ Little ones will often come back when they see how the village is taking shape. Forcing them never helps; it’s just exhausting for everyone.
Are siblings fighting over materials?
Simply avoid it: Everyone gets their own things. If in doubt, it’s better to have two tubes of red paint than one. A little more money spent is well invested for family peace.
Does the house look completely different to how you planned?
Is the entire house suddenly black? Then it’s a chocolate house! Children often have much more creative ideas than adults, and that’s a good thing.
Technical mishaps?
Cardboard tears? “That’s a secret door now.” Paint dripping? “Rain on the roof!” House tilting? Just stick it down or put a small stone underneath. These are all solvable issues and can often be a fun moment.
If everyone is tired and not in the mood?
Take a break. Simply leave the project and perhaps continue the next day. You’ll soon find yourself being asked, ‘Can we build houses again today?’
Want to see all the steps again?
5 parent hacks for relaxed crafting
- The evening-before trick
While your children are asleep, prepare everything: wash and dry the drinks cartons, open and test the paints, pre-sort the brushes and cover the workstation. The next day, it’s just a case of: ‘Ta-da! We can get started straight away!’ This easily saves an hour with impatient children. - The one-child-one-tool rule
Each child gets their own brush, paint tray and damp cloth. It sounds complicated, but it prevents 90 per cent of all arguments. The peace and quiet you enjoy are worth their weight in gold. - The 10-minute tidy-up timer
After 20–30 minutes of crafting, clear away the biggest mess together. This includes tubes that are no longer needed, scissors that have finished their job and any waste produced. This keeps the work surface clear, so it’s not a complete mess at the end. Tip: Make a game out of it! ‘Who can collect the most red things?’ works wonders. - The smartphone trick for memories
Don’t forget to take photos along the way. Not just of the end result, but also of little hands, splashes of colour and the first window. These memories are often much more valuable than the perfect village. - Have a plan B ready!
In case the project fails (e.g. paint runs out, child gets upset, house gets damaged): A quick alternative plan can save the day: ‘Then we’ll just make handprint reindeer!’ always works.
If you’re looking to expand your creative ideas, take a look at these.
❄️ Snow effect for advanced crafters
Create a magical winter wonderland by pulling apart some cotton wool and placing it loosely between the houses. Children love making and throwing little ‘snowballs’, which also helps develop their fine motor skills. A small hand mirror can be used to create a frozen village pond, with the little houses reflected in it. Flat grey or brown pebbles can represent small paths or squares. These can easily be made ‘snowy’ with white paint or artificial snow. The resulting effect looks great with little effort.
🏠 Bring your village alive
Add some life to your Christmas village with little figures, toy animals (what about a penguin?), a cotton wool snowman or homemade gnomes made from pine cones, felt and wooden beads. You can also add Christmas bells. Children can make up their own stories, such as, ‘The Miller family live here and Father Christmas sleeps there.’ This promotes imagination and language development without any instructions.
✨ Street lighting with fairy lights
A mini LED fairy light chain strung between the houses creates a magical atmosphere in the evening. The warm lighting makes the village look like a real miniature world. Tip: Using a timer on the lights saves batteries and automatically brings Christmas magic into the room in the evening.
🏰 Turn your Christmas village into a town
Turn shoe boxes into schools or town halls, medicine boxes into dog kennels and larger shipping boxes into churches or castles. With a little imagination, you can create a whole village, or even a town and expand it year after year.
🌸 The seasonal village
Why do crafts only at Christmas? In spring, decorate the village with flowers instead of Christmas decorations; in summer, with geraniums and colourful fabric bunting; and in autumn, with leaves and miniature pumpkins. This allows children to experience the changing seasons and do crafts all year round.
♻️ Craft ideas for leftover drinks cartons – not just for Christmas!
The 5-minute pencil holder: cut down the carton and paint it – done! Ideal for a desk in a child’s room or as a gift for Grandma.
Bird-feeding station: Cut down the carton, paint it with waterproof paint and fill it with seeds. Watch the birds from the window in winter for a nature experience at home.
The emergency Advent calendar: Collect 24 small drinks cartons, number them, fill them with mini surprises and poinsettias, and your homemade Advent calendar is ready!
What you really need (and what you can save on)
One-litre milk and juice cartons are perfect for this Christmas craft idea, as they are stable, rectangular and easy to cut. When it comes to acrylic paints, it’s better to buy a few high-quality, basic colours (red, blue, yellow and white) with a CE mark than ten cheap ones that barely cover or smell strong. Essential items include large soft-bristle brushes, fine synthetic brushes for details, LED tealights and good quality children’s scissors.
🏠 What you probably already have at home:
Many useful items have long been gathering dust in our homes, such as an old tablecloth or discarded bed sheet to protect the floor. Newspaper can catch paint splashes and empty jam jars can be used as brush-rinsing containers. Use freezer bags around the plant pots to keep the houses dry. A damp kitchen towel or old T-shirt is ideal for quickly wiping up paint splashes.
🚫 Things you can save on:
Star-shaped glitter, sprinkles, colourful ribbons and special paints are pretty, but not essential. Your Christmas village will still look beautiful, even without going overboard on decorations. Do you really need a professional craft knife? No. A good pair of household scissors and a craft knife from a DIY store will do. Don’t compromise on safety though; look for CE-marked products and children’s scissors.
💡 Tip: Use low-melt hot glue
Low-melt hot glue is a special type of hot-melt adhesive that liquifies at significantly lower temperatures (approx. 100–130°C) than conventional hot glue (about 170–200°C). It is used in low-melt glue guns that are designed for this temperature. This makes it safer, as the risk of burns is significantly lower. It’s also ideal for more delicate materials such as foam, thin cardboard and certain plastics, which normal hot-melt glue would easily damage. Another advantage is that the shorter heat-up time means low-melt glue guns are ready for use more quickly. However, it’s important that low-melt glue sticks are only used in low-melt devices. Conventional hot glue guns will get too hot.
Why crafting is good for children
✍️ Motor skills: Writing practice without pressure
When children paint with a brush or cut with scissors, they are training the very muscles they will need for writing. Craft activities develop fine motor skills without the need for tedious exercises. Specifically, gluing moss or colouring in large areas strengthens the hand muscles. Studies show that children who regularly do crafts find it easier to learn to write and have a better pencil grip. Crafting paves the way for beautifully written Christmas cards.
🔧 Problem solving: Little inventors discover the world
‘Why is my house falling down?’ Children are already looking for solutions. They might suggest putting a stone underneath, rearranging the house or reinforcing the walls. They think creatively and logically, learning to solve problems through play. Mathematical concepts such as comparing sizes, counting and estimating also come into play. These skills will help them later at school and in everyday life.
♻️ Sustainability: environmental awareness you can touch!
Empty cardboard boxes become houses — that’s upcycling in action! Children instinctively realise that not everything old belongs in the bin. This fosters a natural environmental awareness. Instead of saying, ‘Buy me this!’, they say ‘Let’s build that!’ instead. This encourages creativity and conveys the idea of conserving resources in a playful way.
🧠 Concentration: crafting as mindfulness training
When children are absorbed in painting, cutting or gluing, they forget about the world around them. These ‘flow moments’ relax children, promote concentration and help reduce stress. Unlike digital media, handicrafts allow children to actively create. This strengthens their self-perception and self-confidence: ‘I can do this!’
🧩 Social skills: creating together brings people together
Crafting together as a family or group promotes consideration, communication, and helpfulness. Children experience how much fun it is to create together without any pressure to perform. Reserved children often blossom in the process. Joint projects strengthen the sense of togetherness. They create new traditions and lasting memories.
The tradition of Christmas villages
🌲 A traditional idea reimagined
Our handmade Christmas village is based on an 18th-century German tradition. In the Ore Mountains in the Saxony region of the country, craftsmen used to carve small wooden houses – known as ‘Putz-Häuser’, meaning ‘decorated houses’ – to represent Bethlehem. These were placed under the Christmas tree. Now, as then, these miniature worlds bring families together. They encourage people to create together and provide a setting for stories and dreams. While traditional versions are often expensive and not very versatile, our drinks carton Christmas village is sustainable and creative, and can be redesigned again and again.
🌍 Miniature worlds are loved around the globe
The desire for a cute little Christmas world is universal. In Italy, artistic ‘Presepi’ Nativity scenes are created, in Spain, they are called ‘Belenes’, in Norway Christmas villages are known as ‘Julebyer’, and in the USA ‘Christmas villages’ are popular. Families everywhere are crafting, telling stories and creating memories. With your homemade festive village, you can become part of this global tradition in a modern, sustainable and personal way.
🧬 Traditions can change
Imagine your children doing crafts with their own children in years to come, saying, ‘We used to do that too.’ Moments like this create family history. Traditions don’t have to be rigid. They can evolve and incorporate new values. Today, sustainability, creativity and togetherness are a matter of course.
Why do miniature worlds fascinate us so much?
In the tiny world of the Christmas village, everything is manageable. This provides a calming contrast to the hectic pace of everyday life. Children can invent stories, act out scenes and let their imaginations run wild. The miniature world becomes a big stage for dreams, magic and Christmas miracles.
What do children learn from Christmas crafts?
Little ones develop important skills when crafting:
- Fine motor skills: activities such as cutting, gluing and colouring help strengthen the hand muscles, which supports learning to write.
- Creativity: Designing their own creations strengthens their imagination and ability to express themselves.
- Problem-solving: Children find solutions independently, e.g. for wobbly houses or paints that don’t cover surfaces well.
- Concentration: Crafting promotes attention to detail and perseverance through focused work.
- Sustainability: Upcycling projects, such as this Christmas village, promote environmental awareness through play.
- Social skills: Working together on craft projects strengthens team spirit, consideration and helpfulness.
What is the minimum age for this project?
Children aged 3+ can help out under supervision, especially with painting and decorating. Children under 3 still lack the fine motor skills required for most of the work. From age 5, they can take on small craft tasks, such as cutting out or sketching. From about 7, many children can work almost independently and even guide younger siblings. Older children should only carry out cutting work with sharp tools under adult supervision.
How can you make Christmas decorations with children?
Here’s how to do festive crafts with children, creatively and stress-free:
Choose simple materials such as empty cardboard boxes, paper and natural items.
Prepare your workspace by covering it with newspaper and having brushes and paints to hand.
Choose small projects, such as a step-by-step homemade Christmas village, paper stars, or tree decorations.
Assign age-appropriate tasks: Younger children can paint, while older ones can cut or design.
Use safe tools: Use children’s scissors and non-toxic paints – no sharp knives!
Appreciate the results. Perfection is not the ultimate goal — what matters is the joy and sense of achievement.
Which paints can be used on drinks cartons and how should the surface be prepared?
Water-based acrylics and specialist paints for plastic work best. Important: Remove the printed outer layer of the carton. Underneath is a matt, white surface that the paint adheres to better. Alternatively, the surface can be lightly roughened with fine, 220-grit sandpaper. Before painting, we recommend testing a colour sample and allowing it to dry. If you can’t scrape the colour off afterwards, you can go ahead with that paint choice. It’s always better to apply two thin coats than one thick one. You don’t need to apply a clear varnish at the end.
How long will my finished Christmas village last?
With proper care, this project will last throughout Advent. The drinks cartons are virtually indestructible, but the mini poinsettias will need a little attention: place them in a bright spot at a temperature of 15-22°C and avoid draughts. Water regularly, but do not overwater.
🔗 Care instructions for mini poinsettias
What should I do if my poinsettias lose their leaves?
This is usually due to draughts, overly warm or cold temperatures, or incorrect watering. Tip: Check the location is suitable, move the plant (if necessary) and water sparingly.
How can I transport my Christmas village safely?
The best way is to pack it in a cardboard box and cover it. If the temperature is below 12°C, make sure you wrap it up warmly. Poinsettias lose their leaves quickly in the cold.
In this video, we also show you how to position the plants correctly.
🎥 In this video, we also show you how to position the plants correctly.
Are poinsettias poisonous to children?
While cultivated forms are considered largely harmless as houseplants, they are not suitable for consumption. Their milky sap can cause skin irritation in sensitive individuals. Do not eat them, avoid contact with mucous membranes and wash your hands if you come into contact with the sap. Contact your doctor if your child experiences any symptoms.
Keep your mini poinsettias looking beautiful for weeks
Mini poinsettias are charming. However, they do need more care than larger varieties, as they dry out more quickly due to the small amount of soil in their pots. With a little attention, though, they will stay healthy and colourful throughout Advent.
- The right location
A bright spot with a temperature of 15-22°C — i.e. cool to normal room temperature — is ideal. In our part of the world, direct winter sunlight is harmless. Place your Christmas village as close to the window as possible, but don’t allow the plants to touch the glass as this may be too cold for them. Keep it away from draughts (i.e. not next to frequently opened doors or windows). Caution: Do not place it directly above a heat source, as the very dry air will damage the poinsettias. - How to water correctly
Mini poinsettias need regular watering, but don’t like to be waterlogged. The best method is to remove the plant from the house, keeping it in its pot, then immerse the pot in room temperature water until no more air bubbles rise to the surface. Do this every day or every second day, then drain well before placing the plant back in its house. - When is the right time to water?
When the soil looks dry or the pot feels unusually light. Depending on the temperature and humidity, daily watering may be necessary. Mini poinsettias need regular attention. - Shopping tips for healthy plants
Look for dense growth, strong green leaves, and closed buds in the centre. Firm, colourful bracts are also a good sign. Buy your plants from a regional nursery, this way you can support local businesses and benefit from specialist knowledge.
Want to find out more about poinsettias and pick up some great decorating ideas? Take a look at our Deco-tips and follow us on Facebook, Instagram, Pinterest or YouTube!